Bambu Conveyor for ESP32
Overview
The Bambu Conveyor is an application designed to manage the waste output of a Bambu Lab 3D printer. It uses MQTT or motion detection to monitor the printer and control a motor that moves purge waste away from the printing area.
v1.5.4 control center
Version 1.5.4 includes the responsive v1.5 control center and opens Settings automatically when printer details are missing. Printer discovery helps fill in the printer details; enter its LAN access code to finish setup. Configured devices and motion mode still open Overview. Superseded beta releases are no longer offered as updates. Established conveyor timing and the v1.5.1 MQTT status-light recovery are preserved.
Update-screen requests can report their source and installed firmware version to help distinguish them from installer downloads. These are reported values, not authenticated device identity. No device identifier, background heartbeat, credentials, local address, or printer details are sent; browser privacy preferences are respected, and GitHub downloads are unchanged.
- Live printer, MQTT, conveyor, physical LED, Wi-Fi, memory, and CPU status
- Manual run, emergency stop, smooth countdowns, and a cooldown-only override
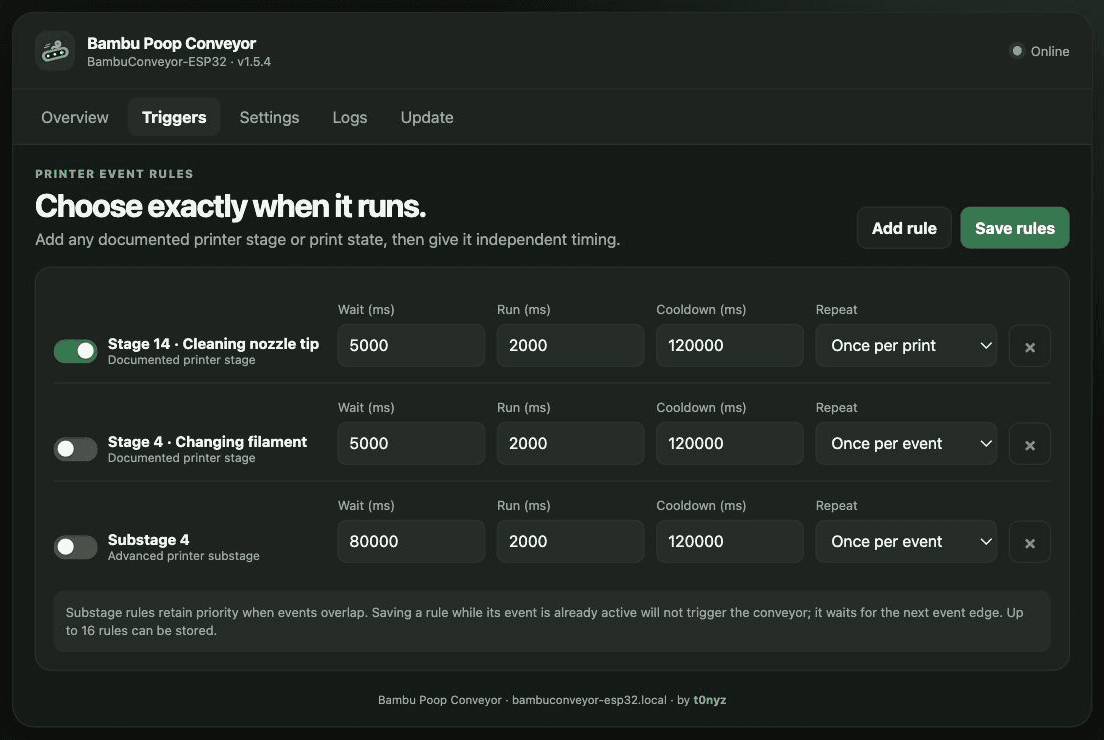
- Configurable printer-stage, substage, and print-state trigger rules with independent timing
- Device logs, local Show/Hide controls for saved credentials, and verified OTA updates
- A friendly
BambuConveyor-ESP32network name andbambuconveyor-esp32.localaddress
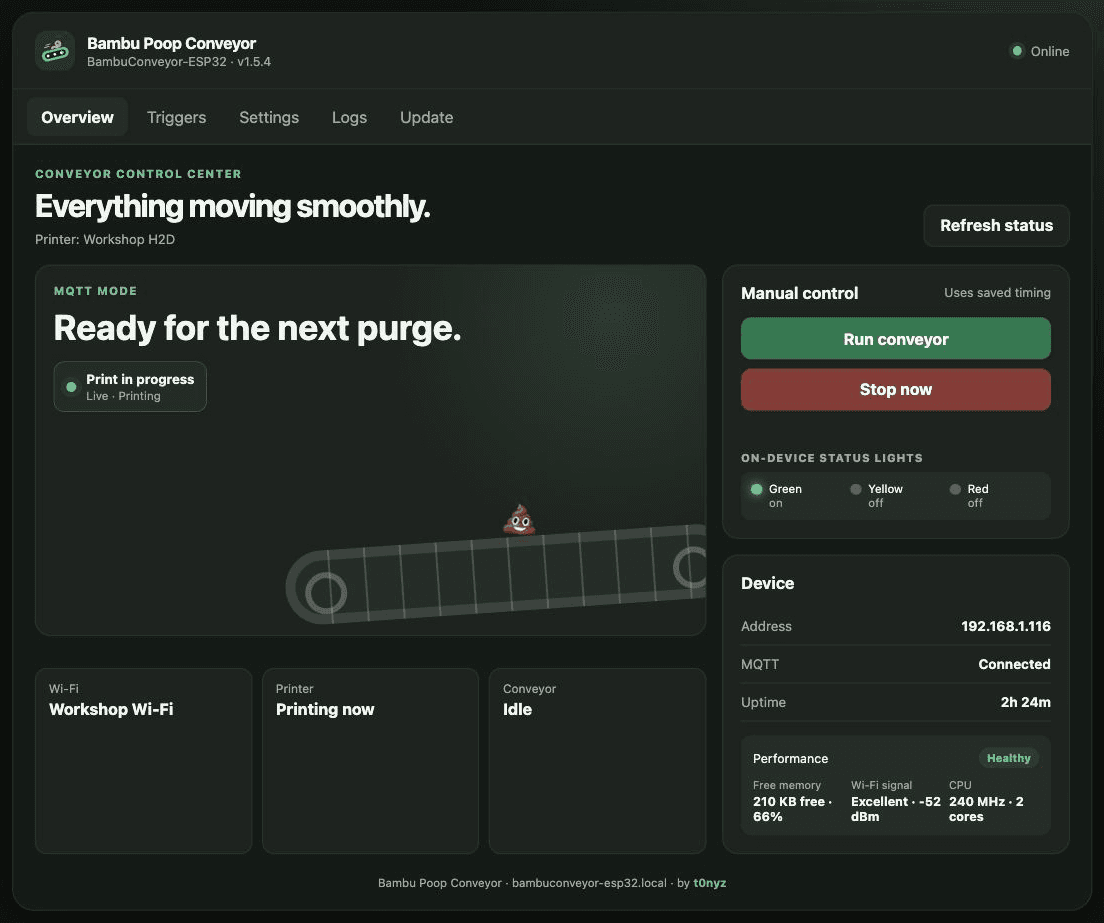
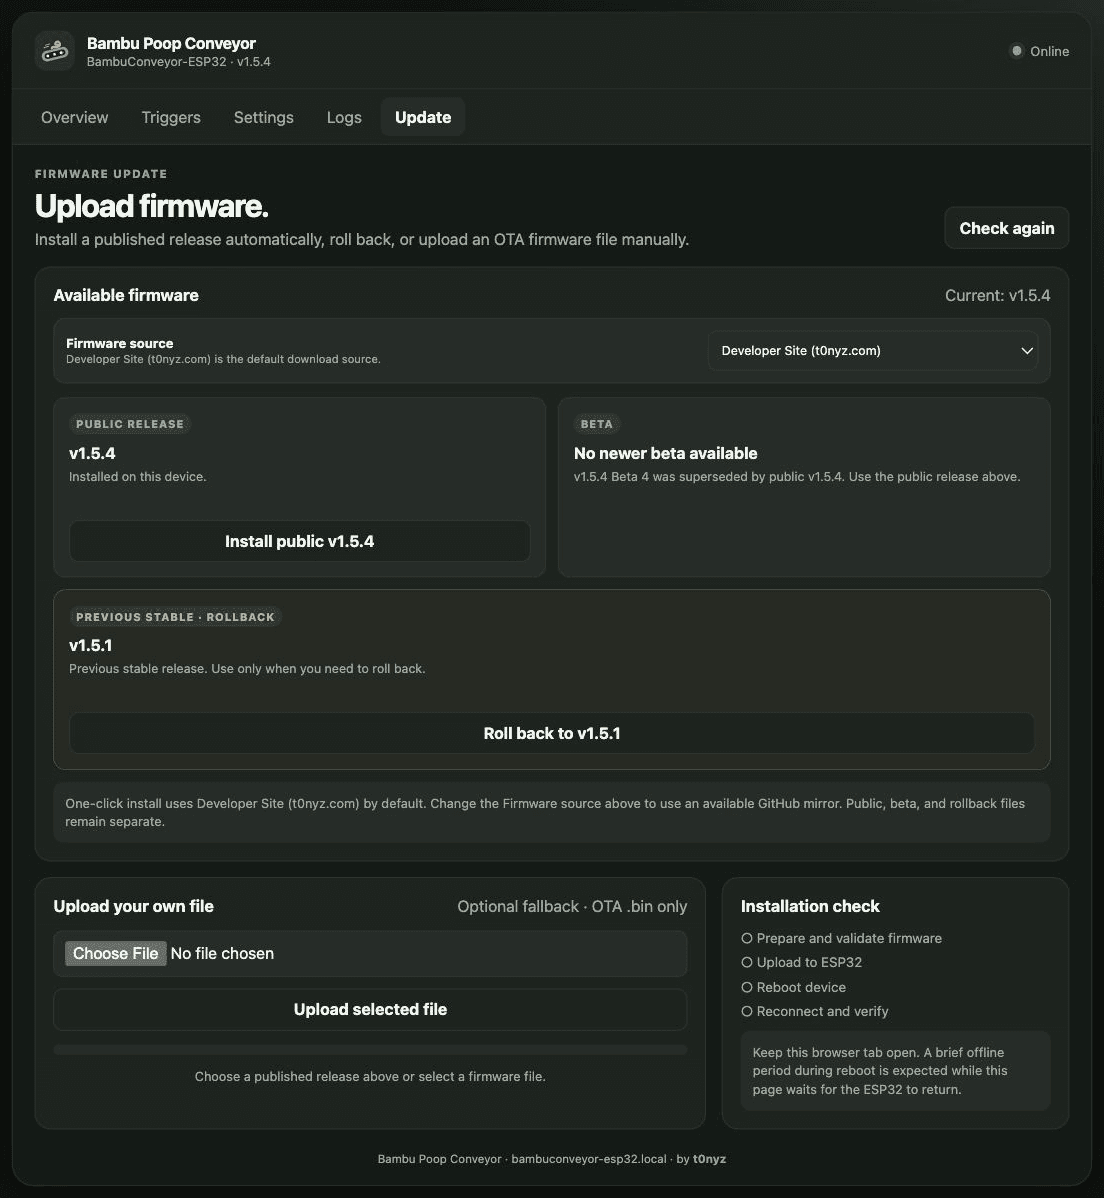
Screenshots show the released v1.5.4 interface with sample network and printer details.
Features
Two Modes of Operation: MQTT or Motion Detection
The Bambu Poop Conveyor supports two methods for triggering the conveyor, depending on your printer model and preference.
1. MQTT Mode (Recommended for X1C) (Default setting)
- Best suited for X1C printers due to their more powerful CPU, which handles MQTT updates more efficiently.
- Listens for printer status changes and automatically activates the conveyor using your saved event rules. Defaults retain the established nozzle-cleaning and optional filament-change behavior.
- Requires a stable network connection and correct MQTT setup.
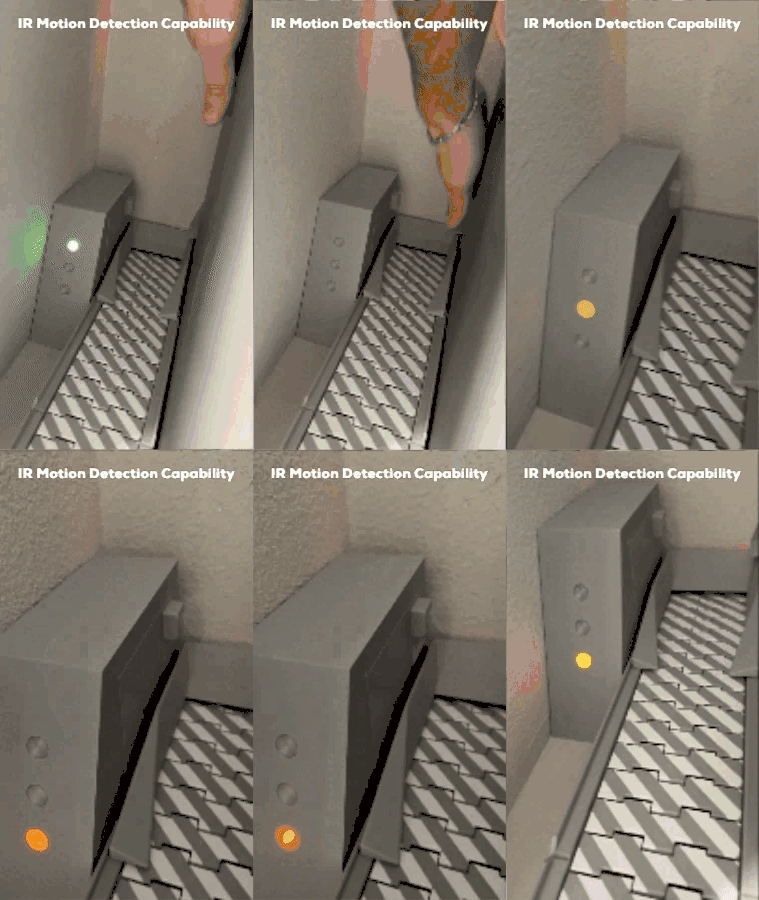
2. IR Motion Detection Mode (Better for P1 & A1 Series)
- Ideal for P1 and A1 series printers, where MQTT performance can be inconsistent.
- Uses the HiLetgo AM312 PIR sensor to detect movement and trigger the conveyor.
- Works independently of network conditions, making it a more reliable option for some setups.
You can configure which mode to use in the settings. If Motion Sensor Mode is active, MQTT Mode is disabled, and vice versa.
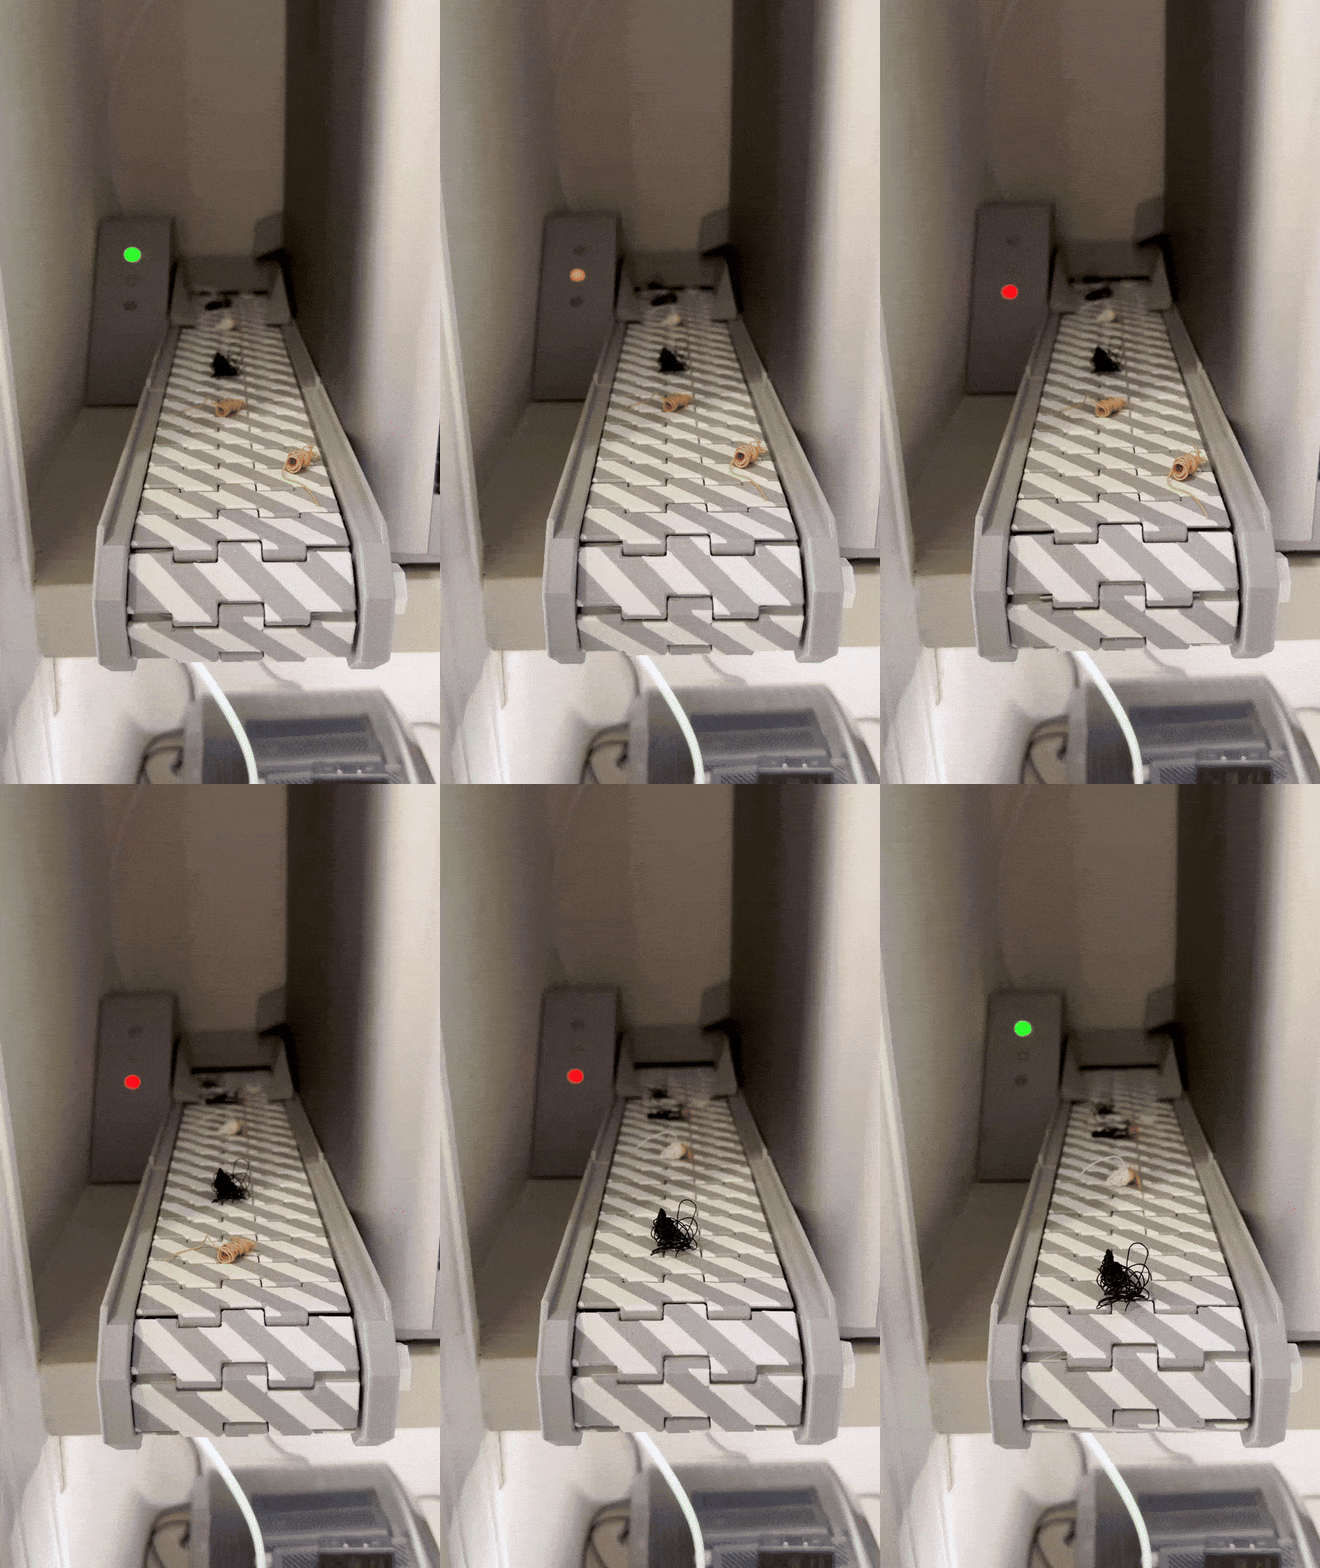
Conveyor Makerworld files (Print these)
-
Conveyor: https://makerworld.com/en/models/148083#profileId-161573
-
Housing:
https://makerworld.com/en/models/1071359#profileId-1061316
Optional prints
-
The back chute that I use: https://makerworld.com/en/models/59961#profileId-81417
-
Conveyor Extension: Optional: If you need your conveyor to be longer use this. (I use one extension in my build): https://makerworld.com/en/models/249714#profileId-359905
Required parts used for this build:
- Breakout board for ESP32: https://amzn.to/4dyjsx0
- ESP32 board: https://amzn.to/4fBjh5L
- 12 Volt power supply: https://amzn.to/4yRdhzA
- Motor Controller: https://amzn.to/3yBPqcM
- 12V 10RPM Motor: https://amzn.to/3M24VOd
- Resistors (I use 470Ω - you need 3 from this kit): https://amzn.to/4cqCi8e
- Wires: https://amzn.to/46EAtn3
- LED’s sourced from this kit: https://amzn.to/4dH5Dw7
Optional parts:
- Motion sensor (For Motion Sensor mode): https://amzn.to/4gtN4gd
- Power connector: https://amzn.to/3T4xRsS
- I use these bearings on my conveyor for smoother action: https://amzn.to/4hjW0WD
Setup
GPIO Pins
The application uses the following GPIO pins for motor and LED control:
const int greenLight = 19;
const int yellowLight = 18;
const int redLight = 4;

int motor1Pin1 = 23;
int motor1Pin2 = 21;
int enable1Pin = 15;

const int motionSensorPin = 22;
Wiring diagram
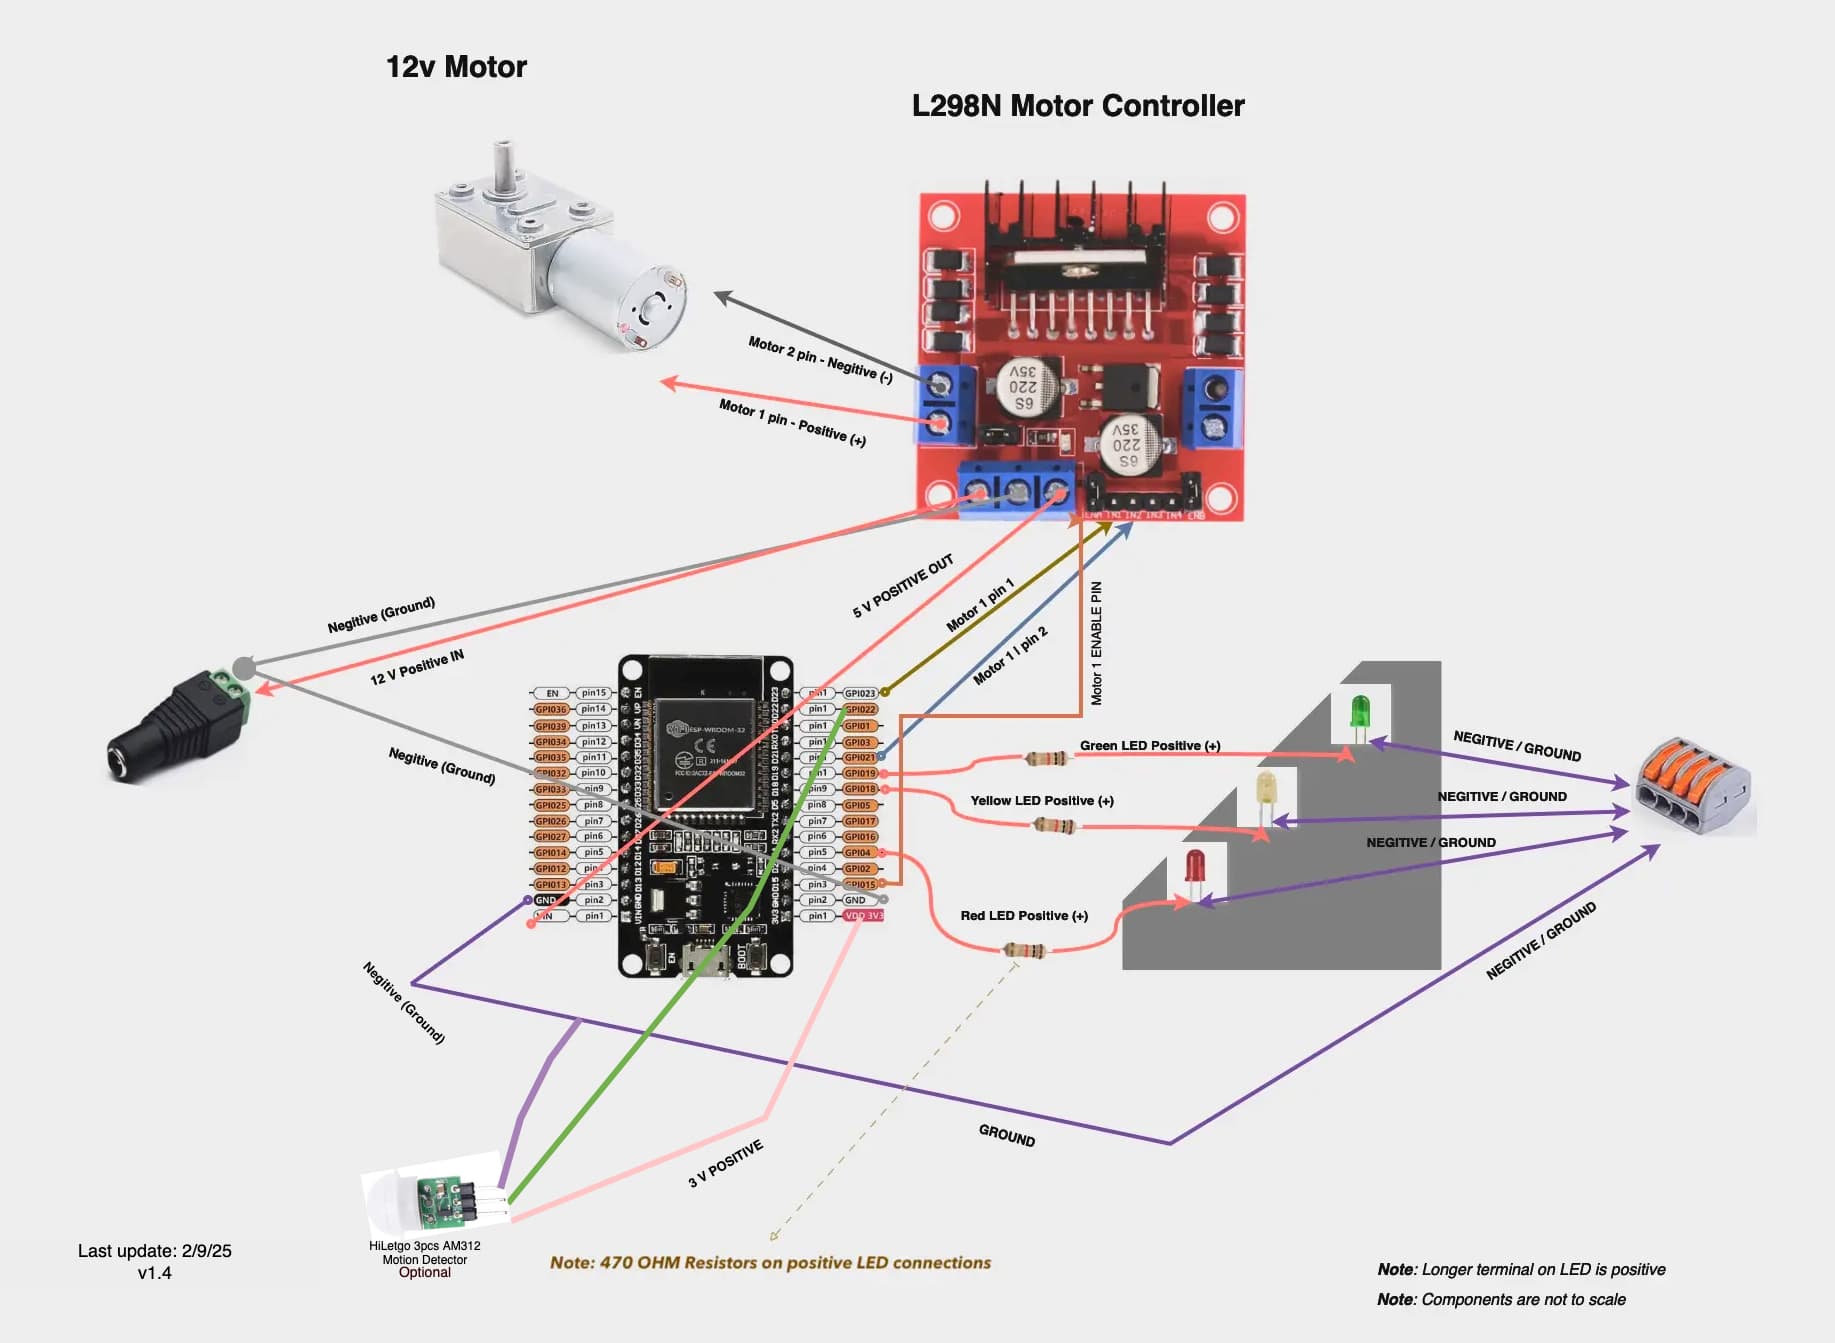
Note:
- The wire color in the diagram will not exactly match my project wires that you will see in the next few images.
- Be sure to use resistors on your LED positive terminals or they will burn out eventually.
- FAQ: How does the ESP32 get power? On the L298N motor controller there is a 12v IN and an optional 5V OUT. The 5V out runs to the ESP32 > VIN (Voltage In) line, which can handle 3-5v. This solution allows us to use one power source (12V) to power our entire project.
- Do not remove any of the jumper pins on the L298N Motor Controller. 5V out is required for the ESP32 as mentioned. See this photo for reference.
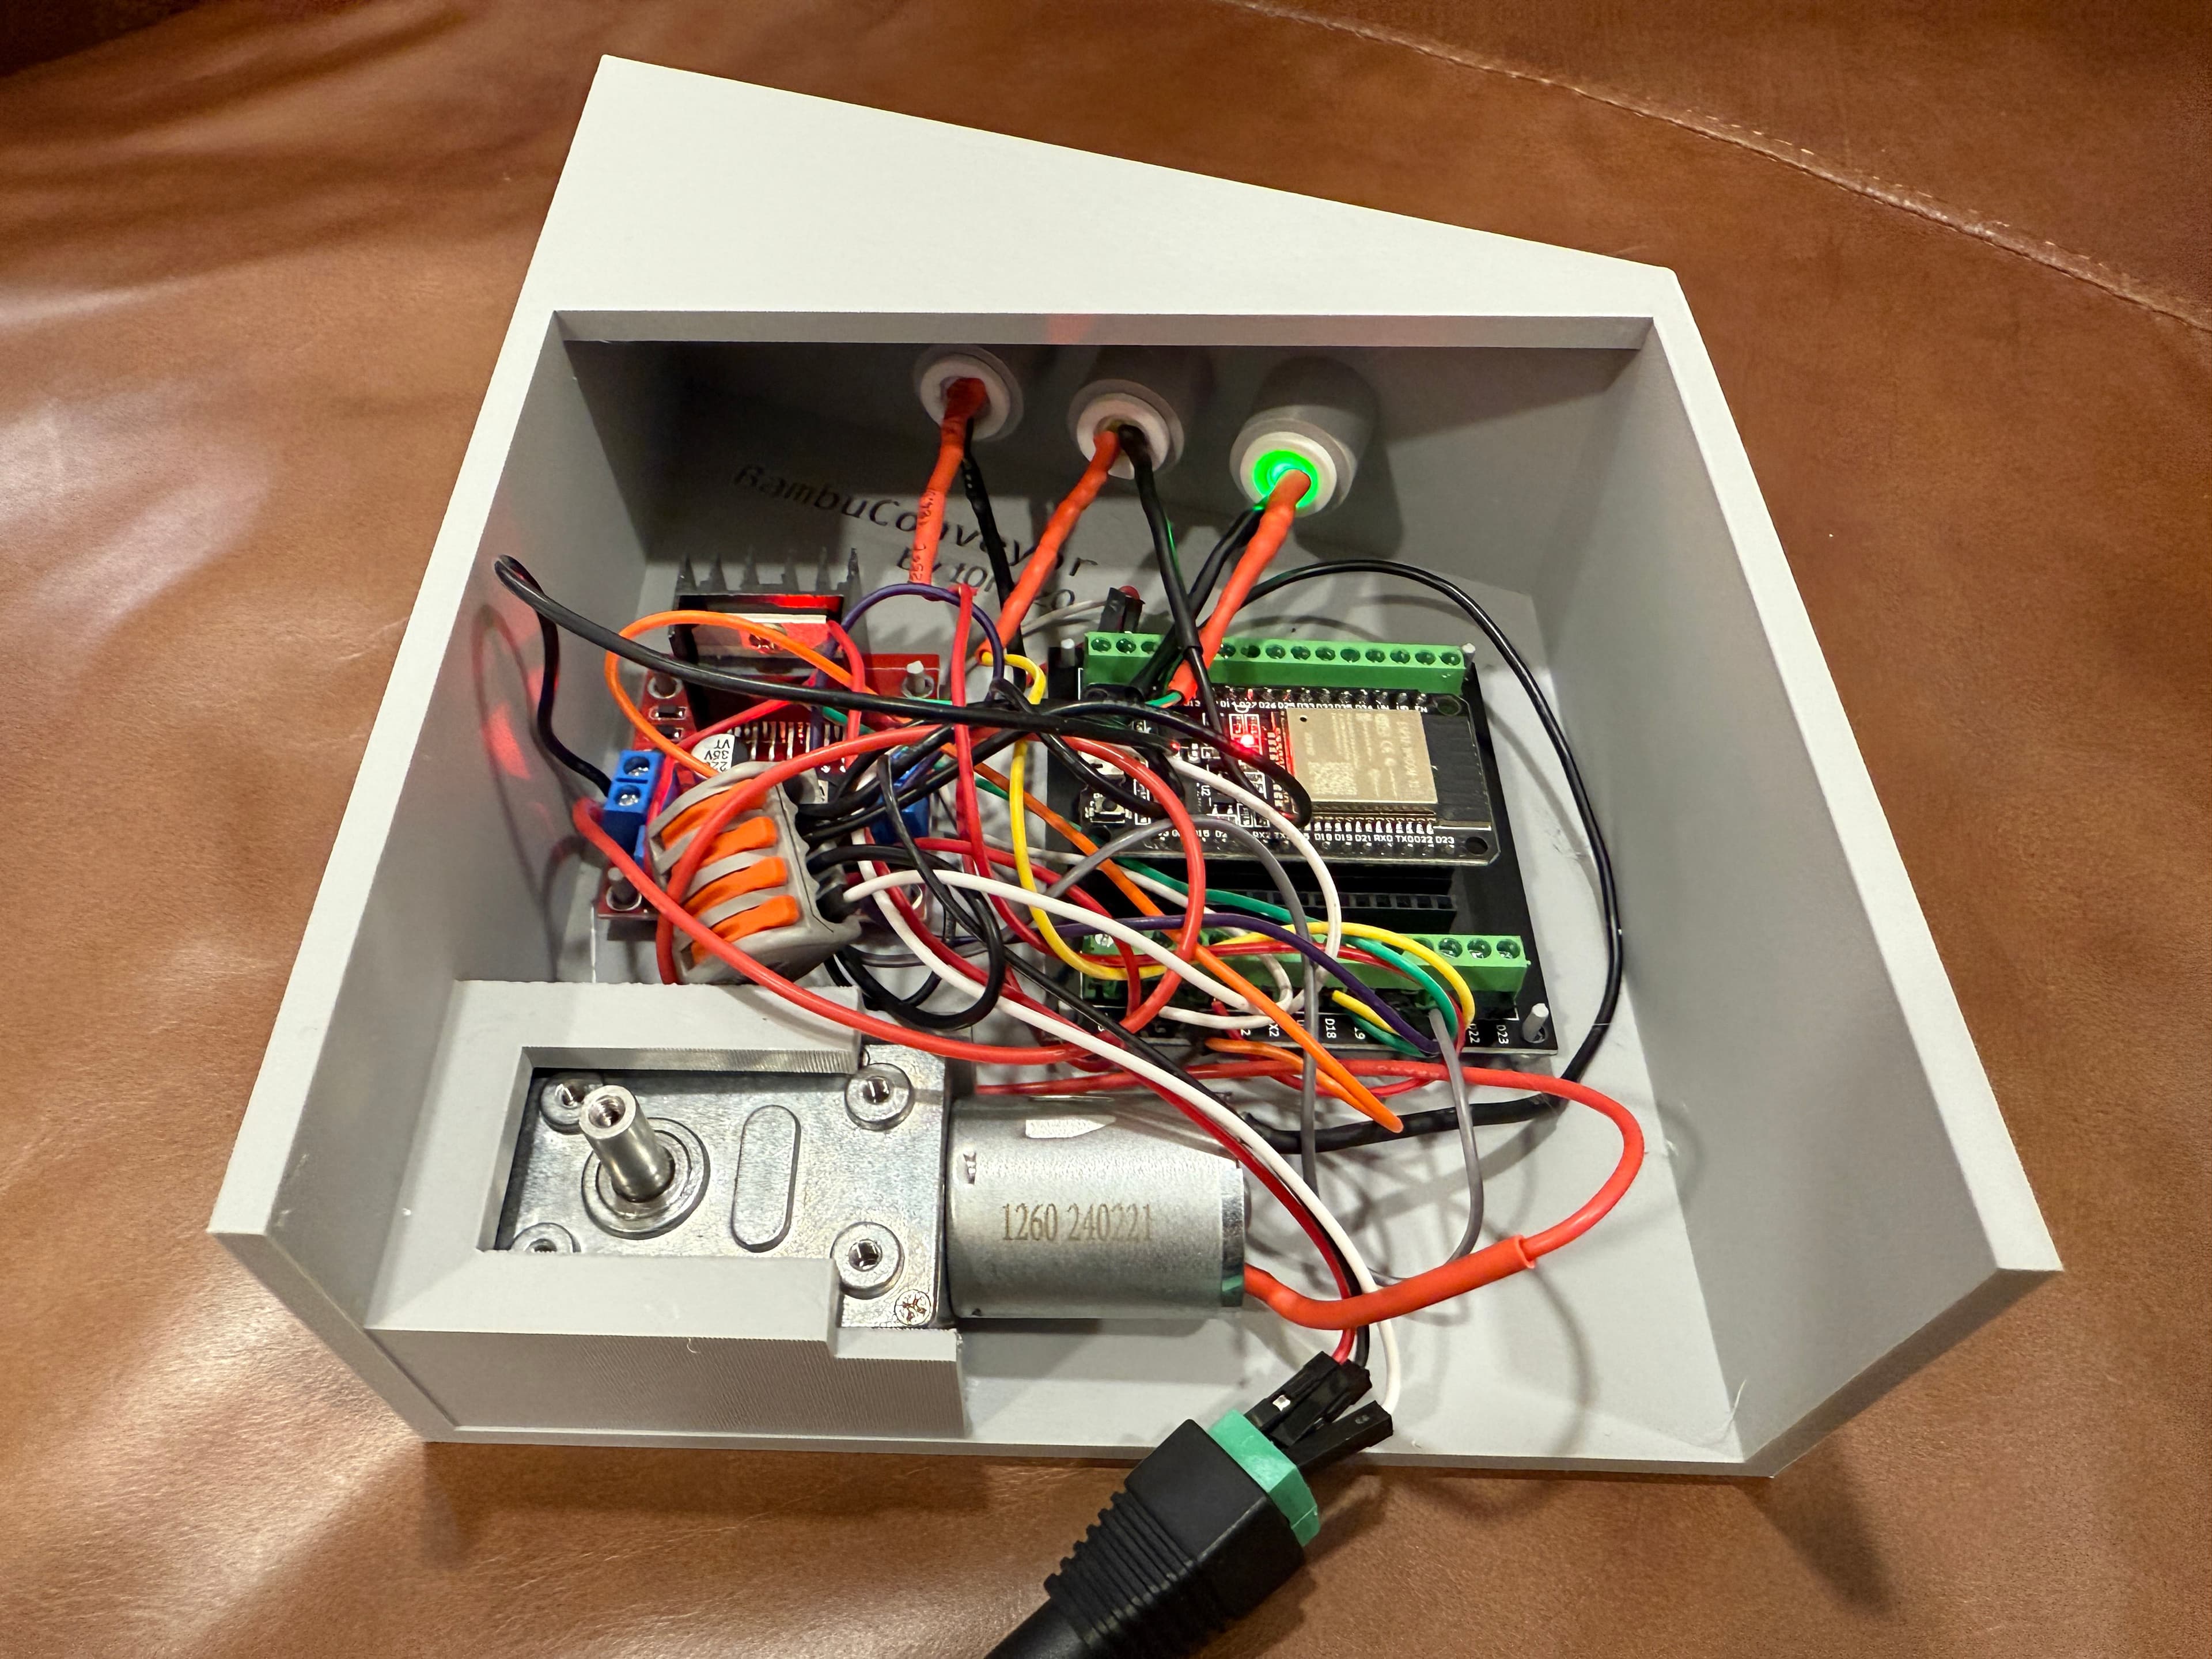
- Having issues figuring out GPIO port 15? Here is a reference photo of my setup, I’ve been able to remove the jumper on the motor 1 enable pin and use the first pin to connect.
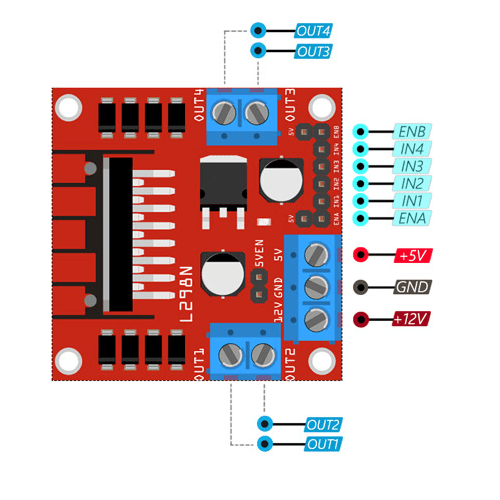
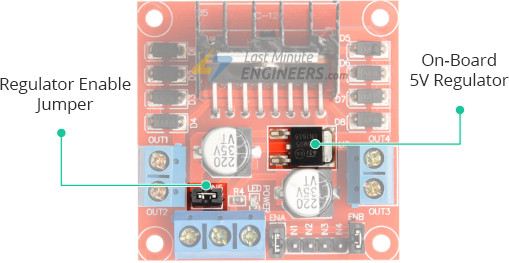
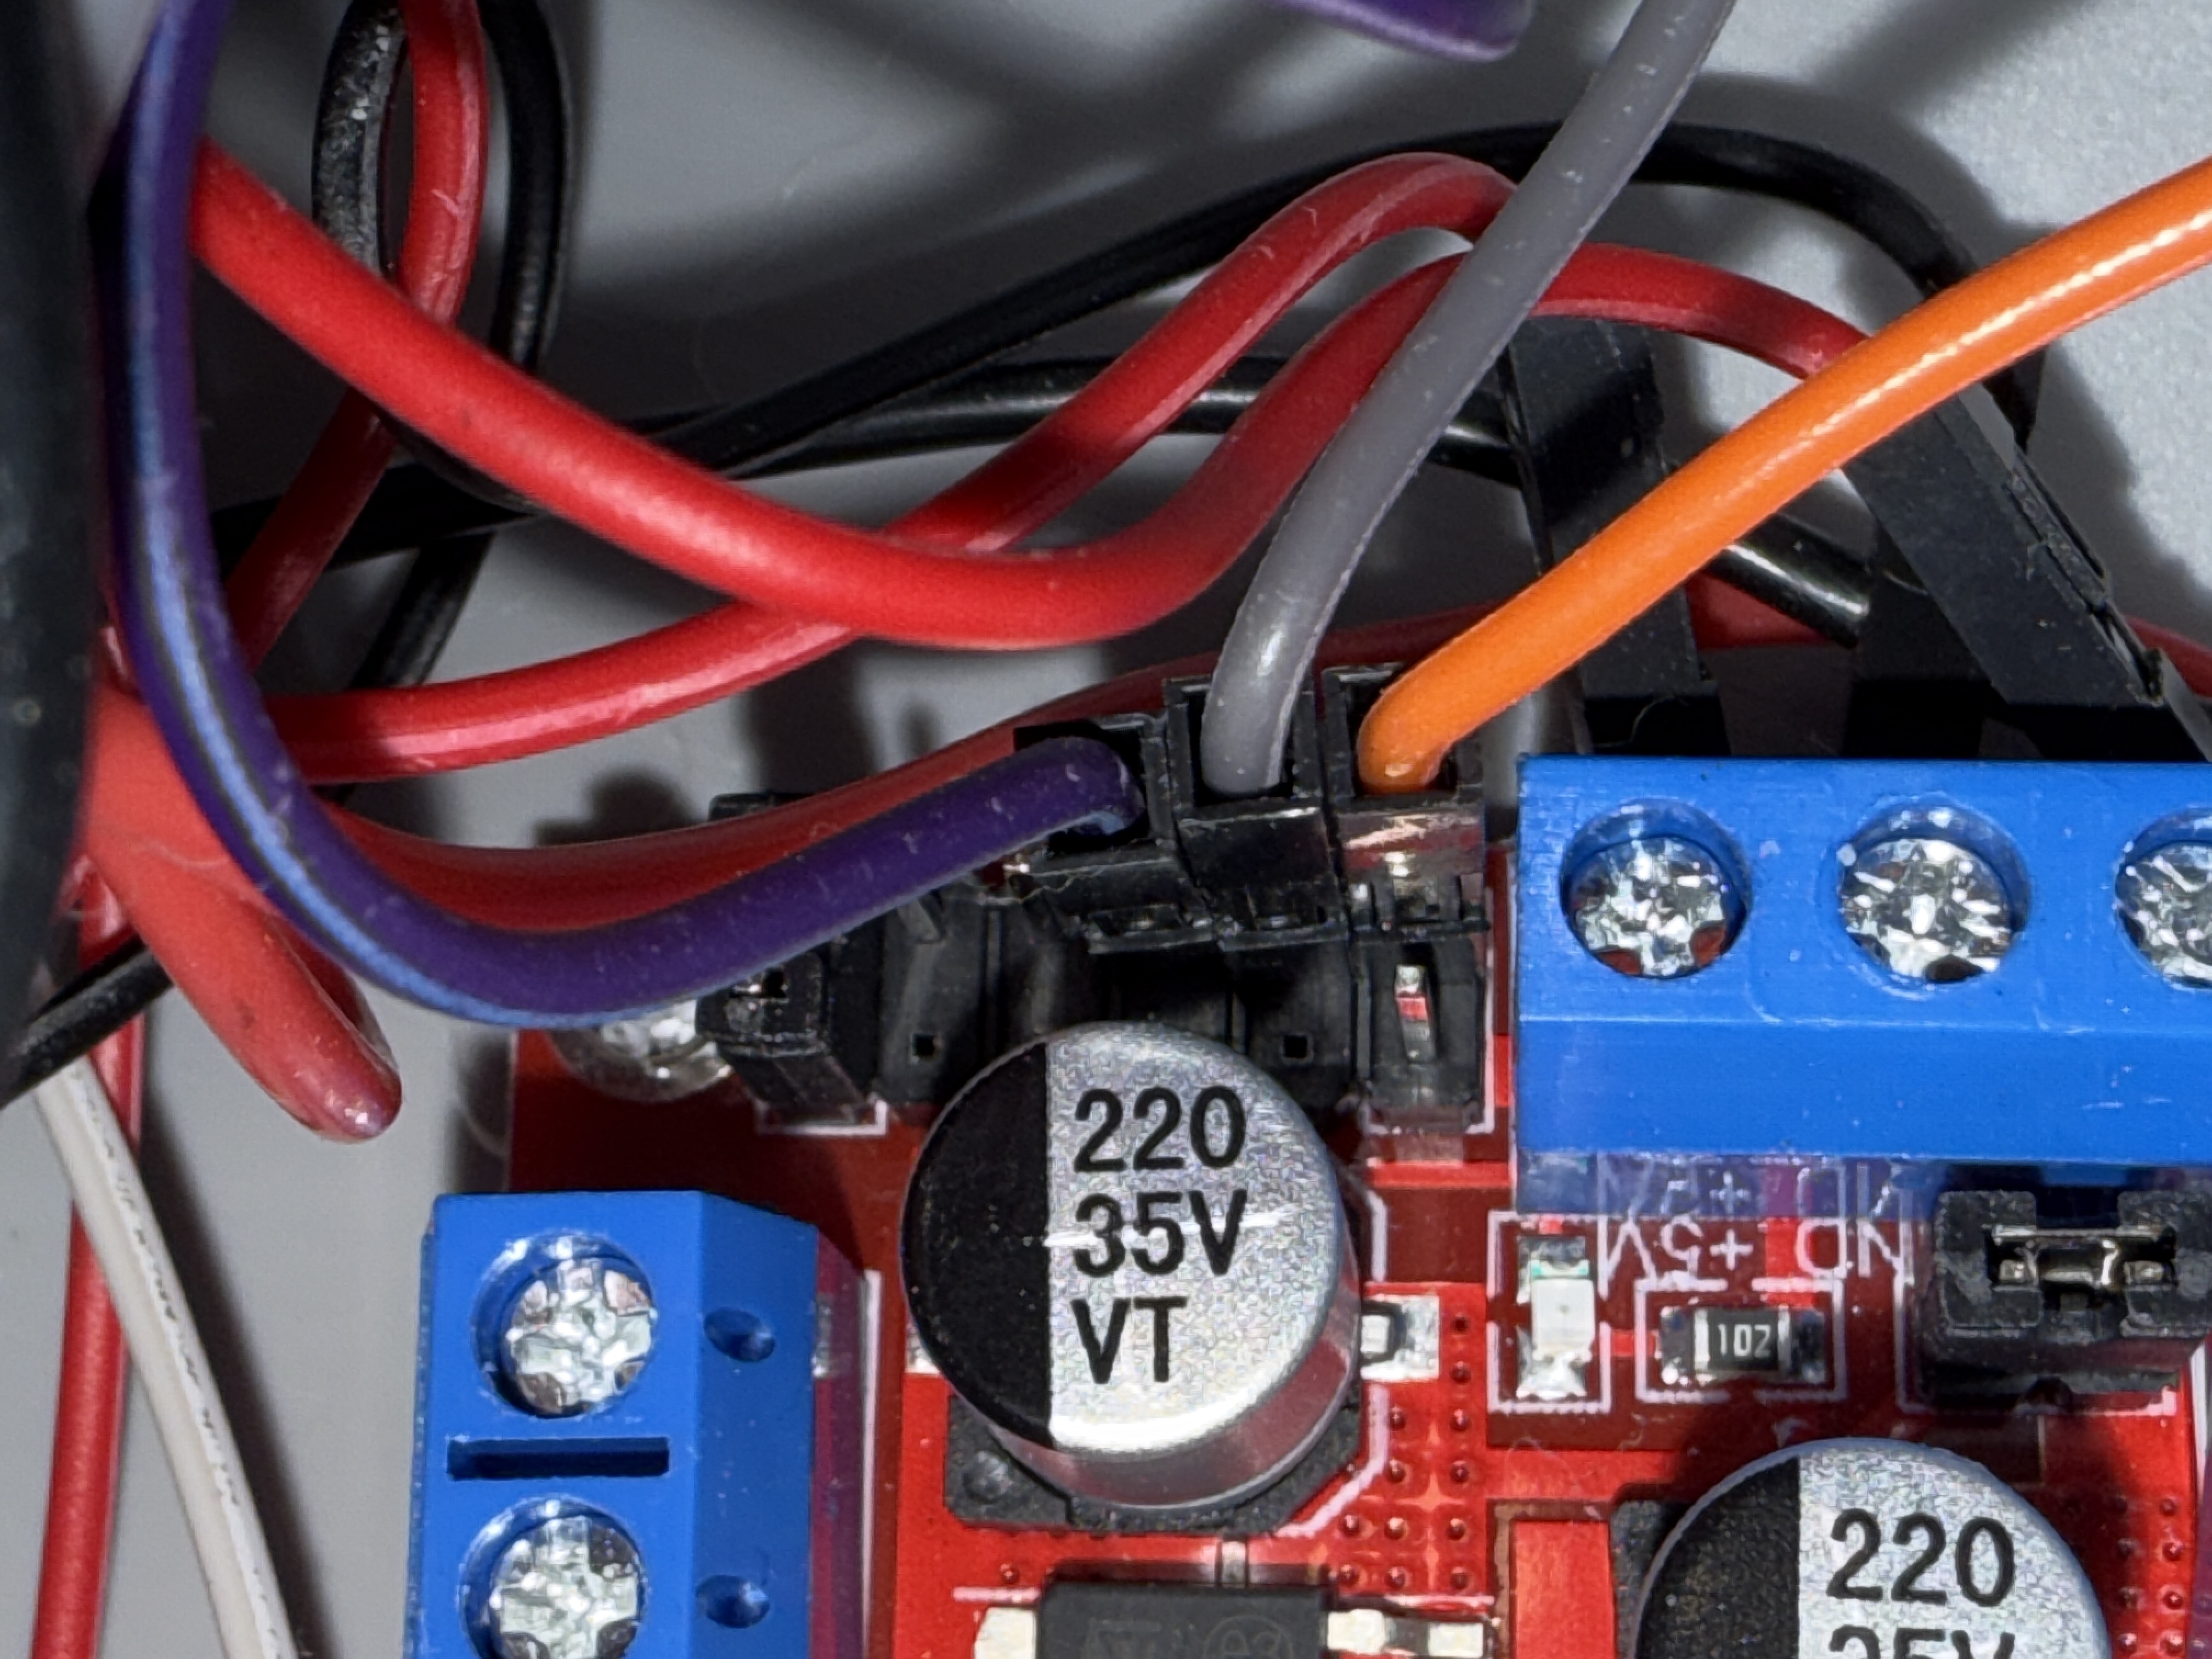
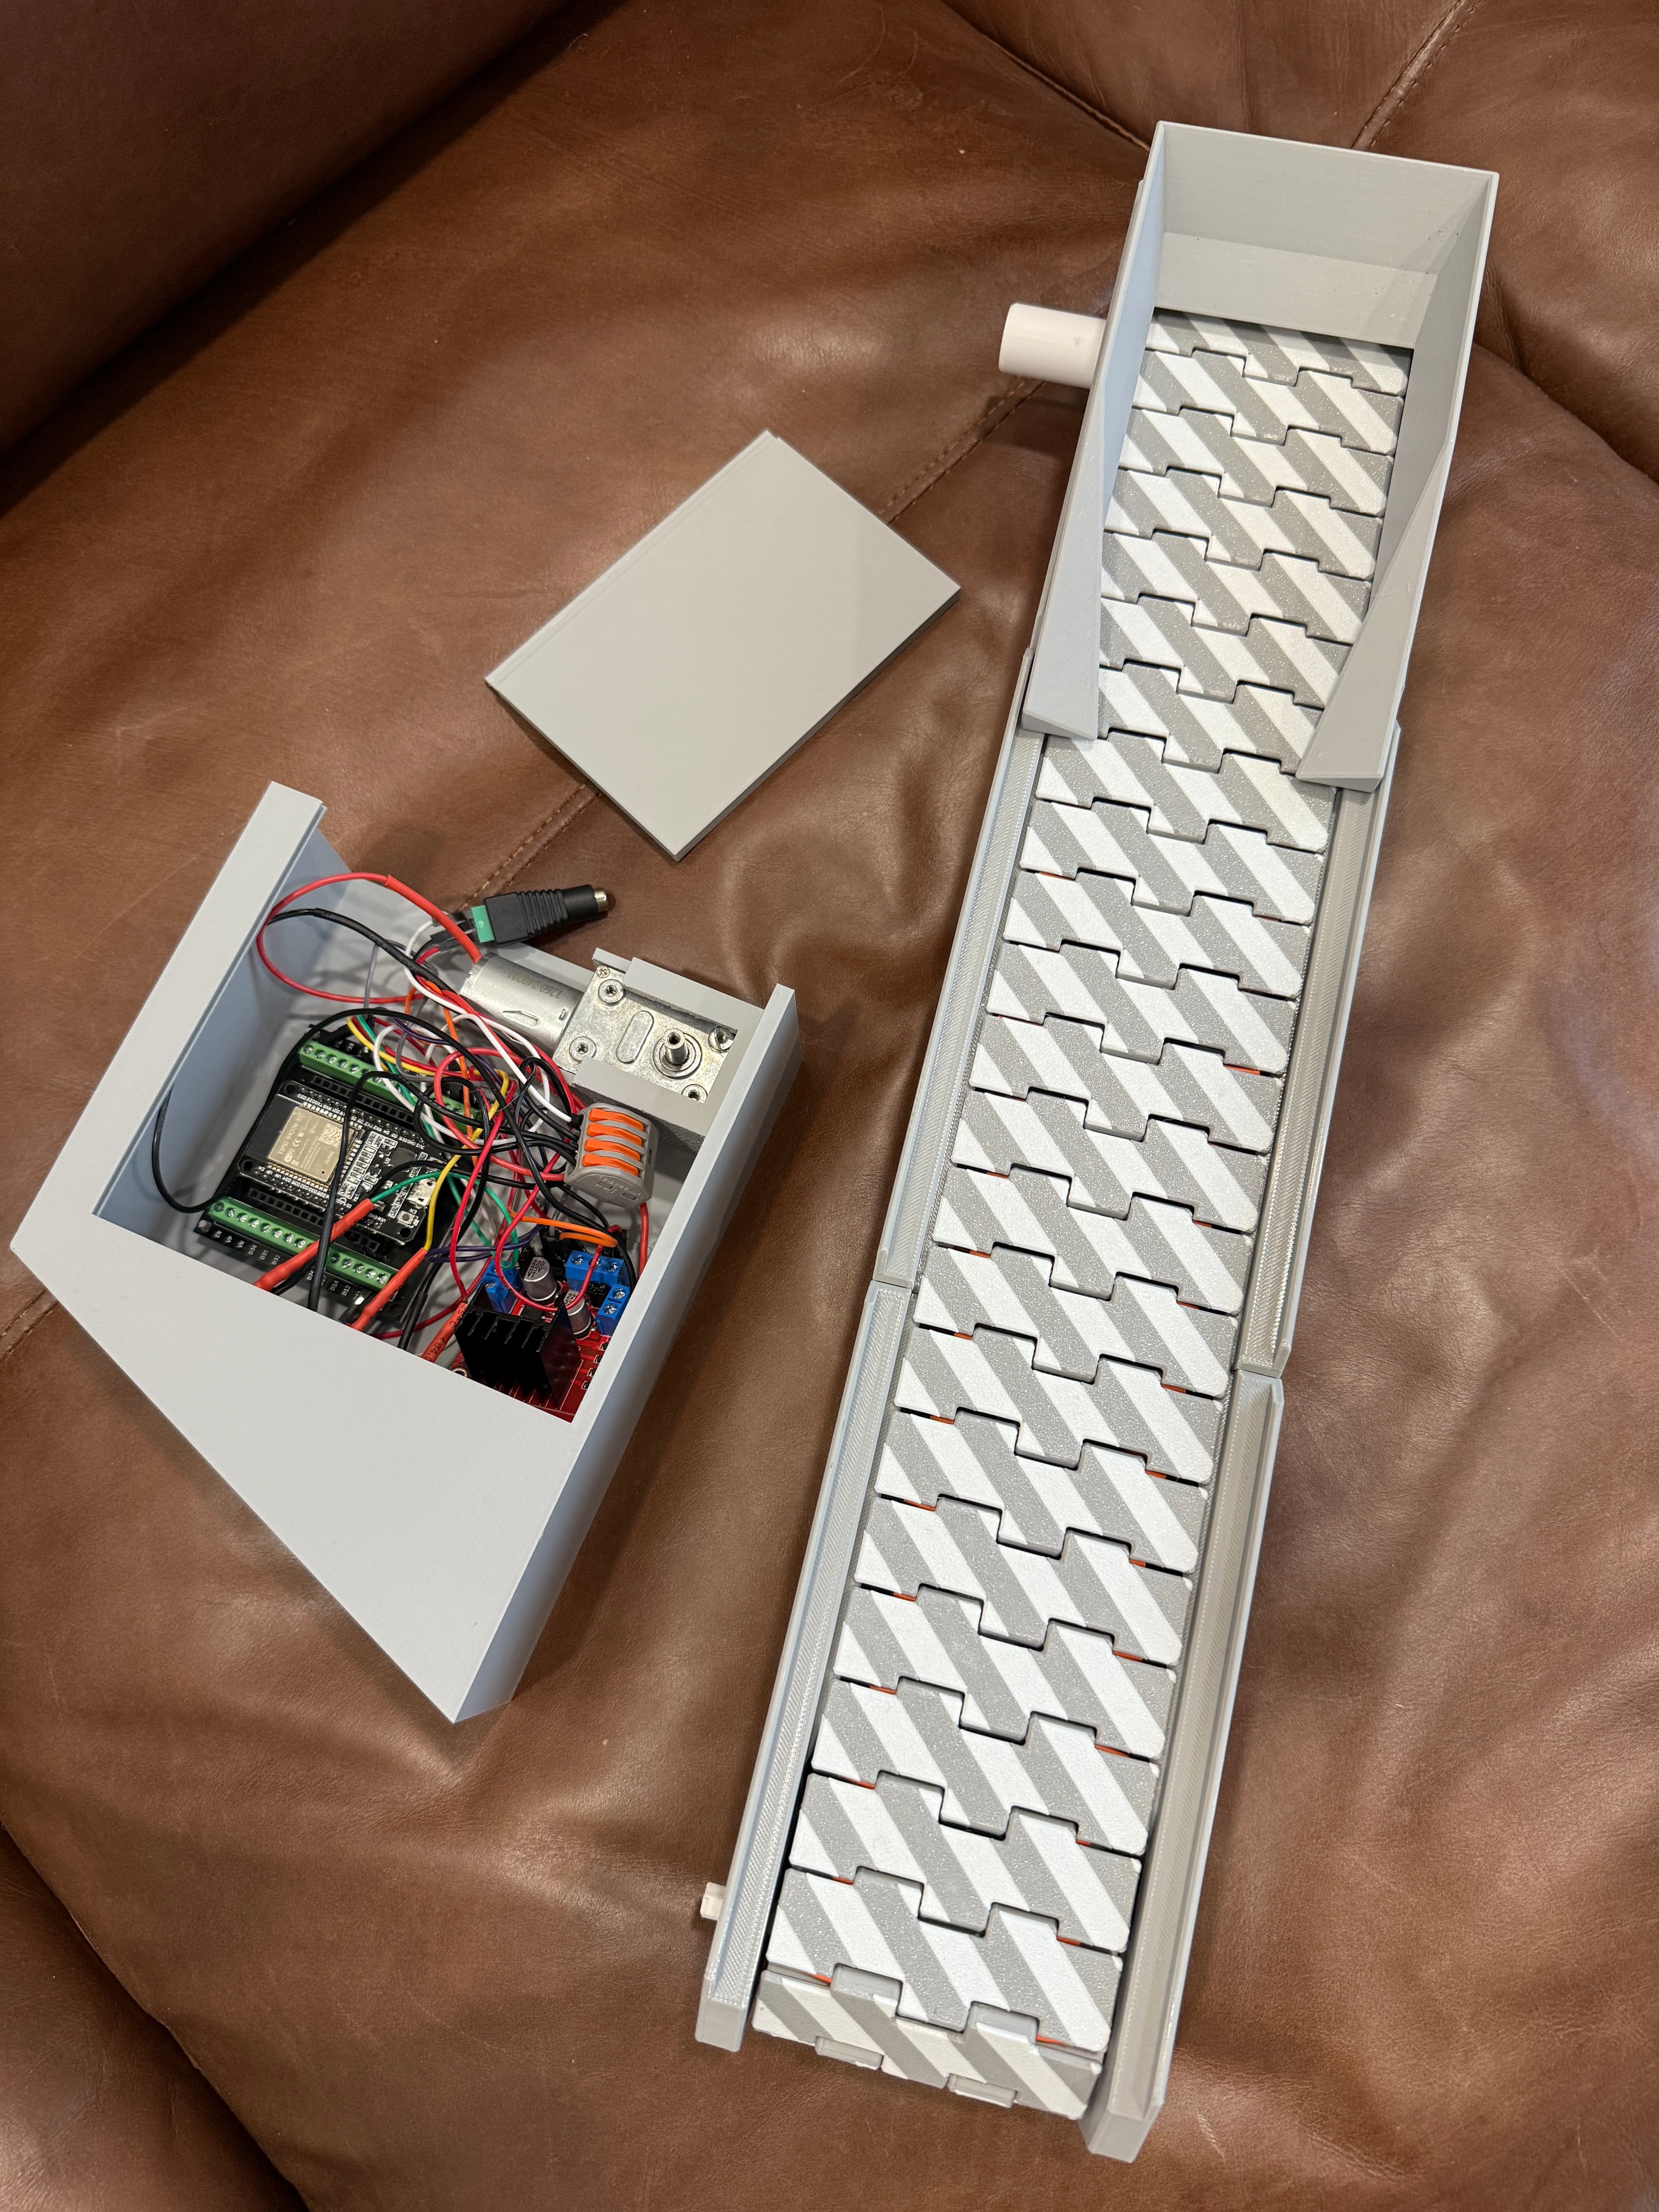
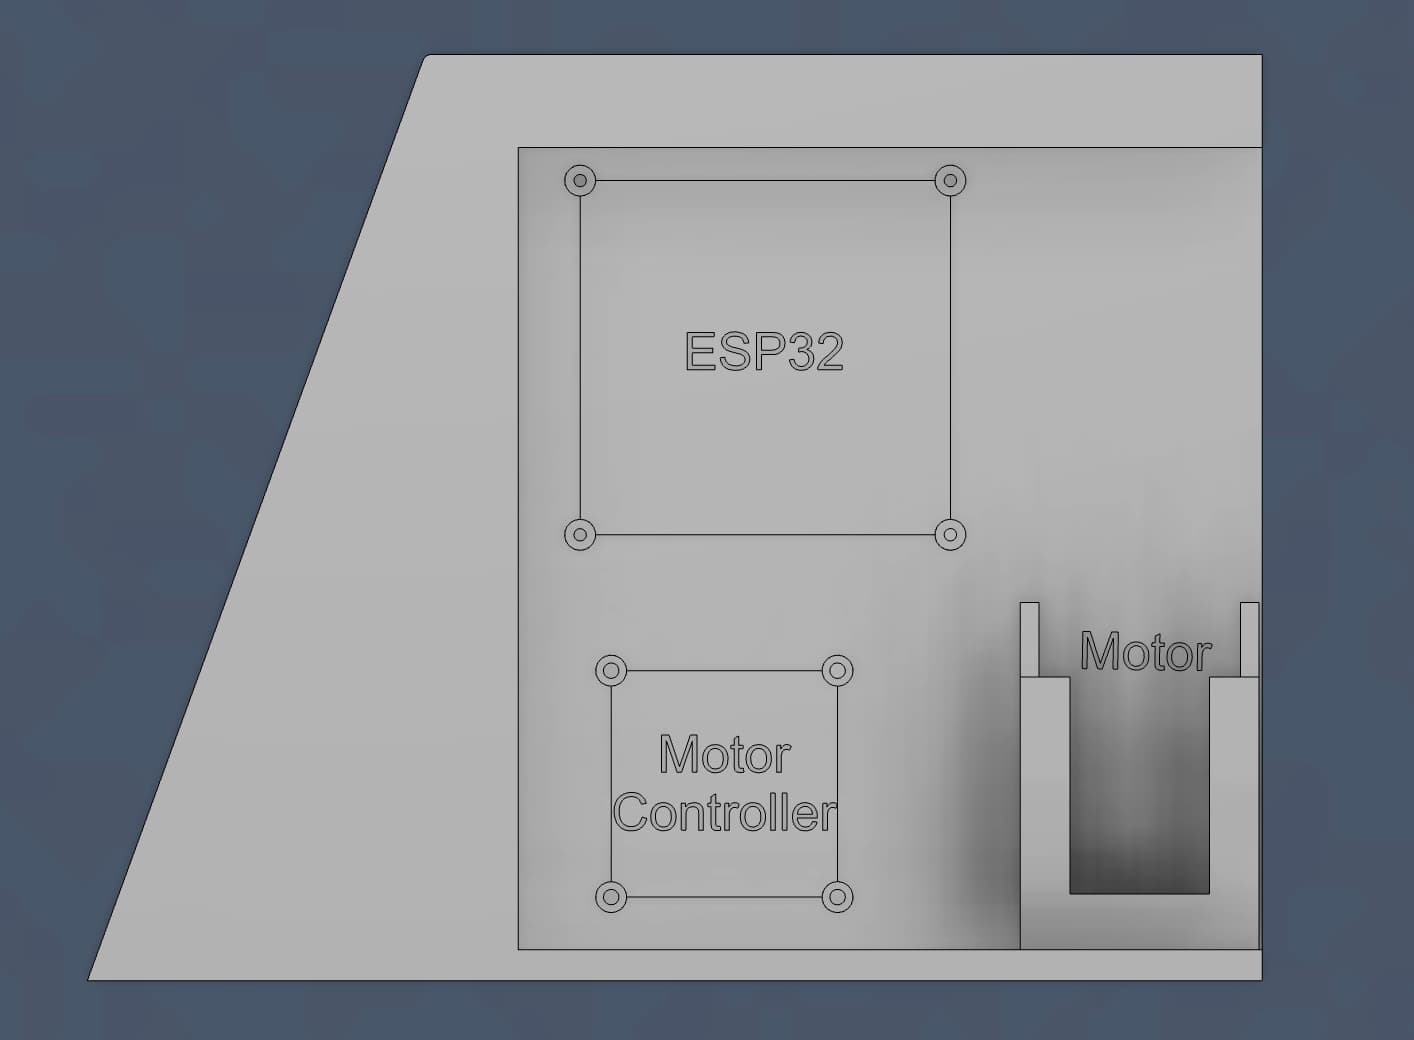
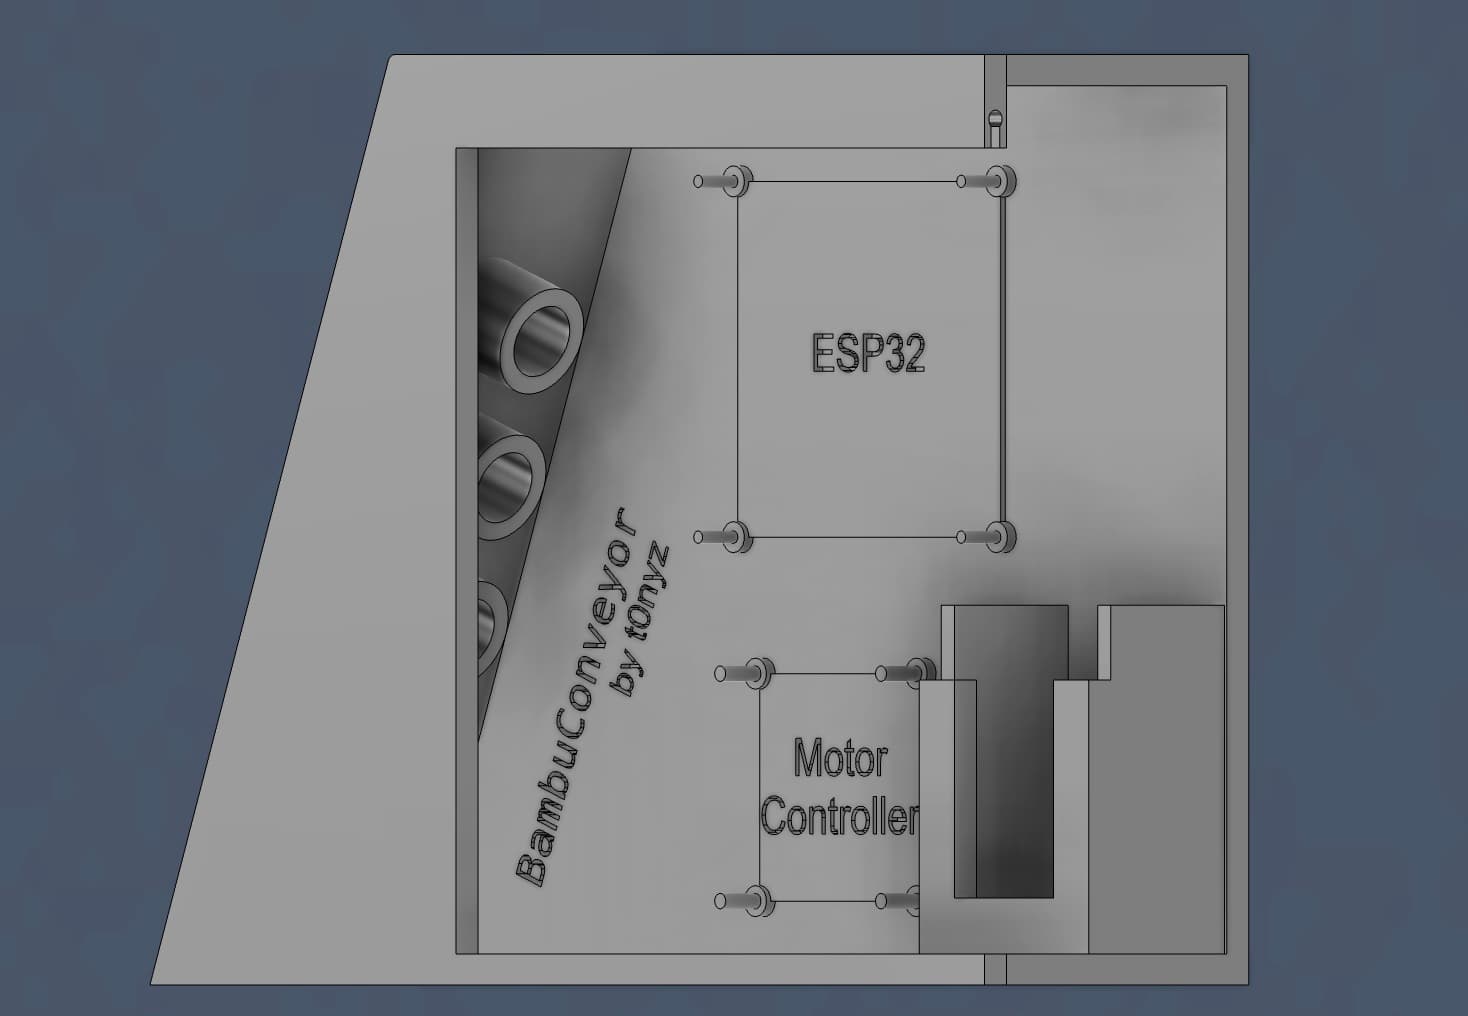
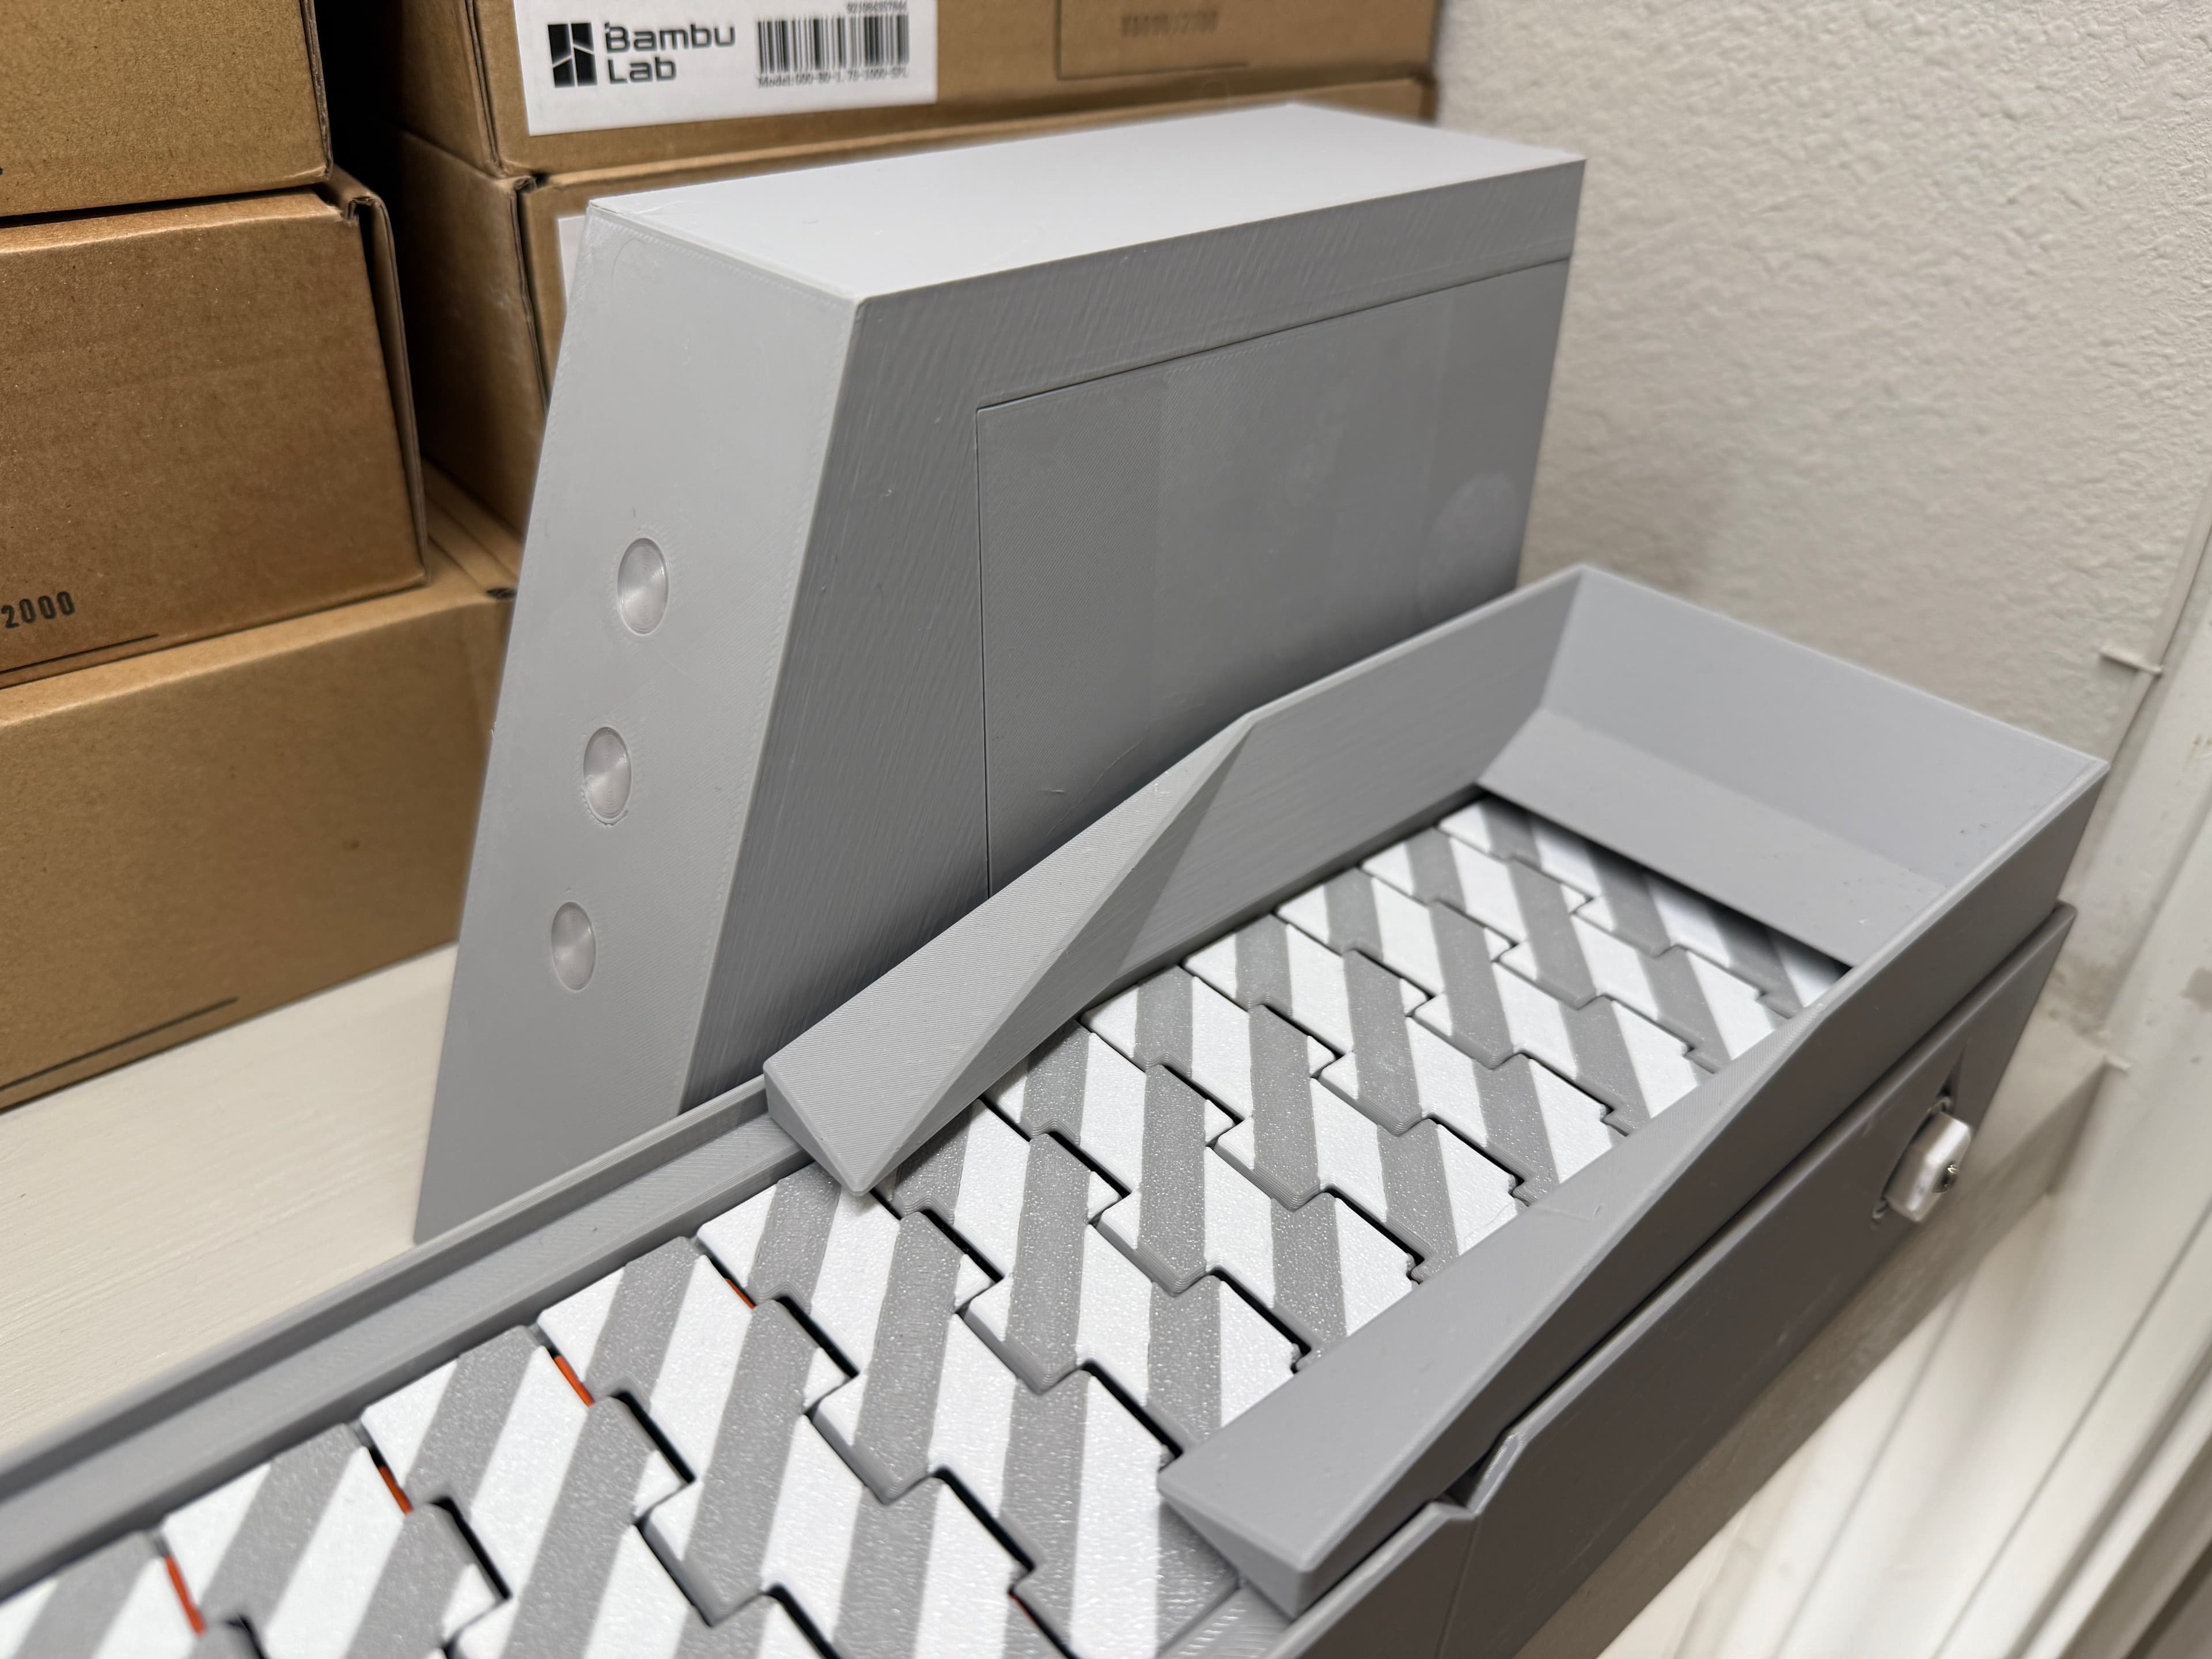
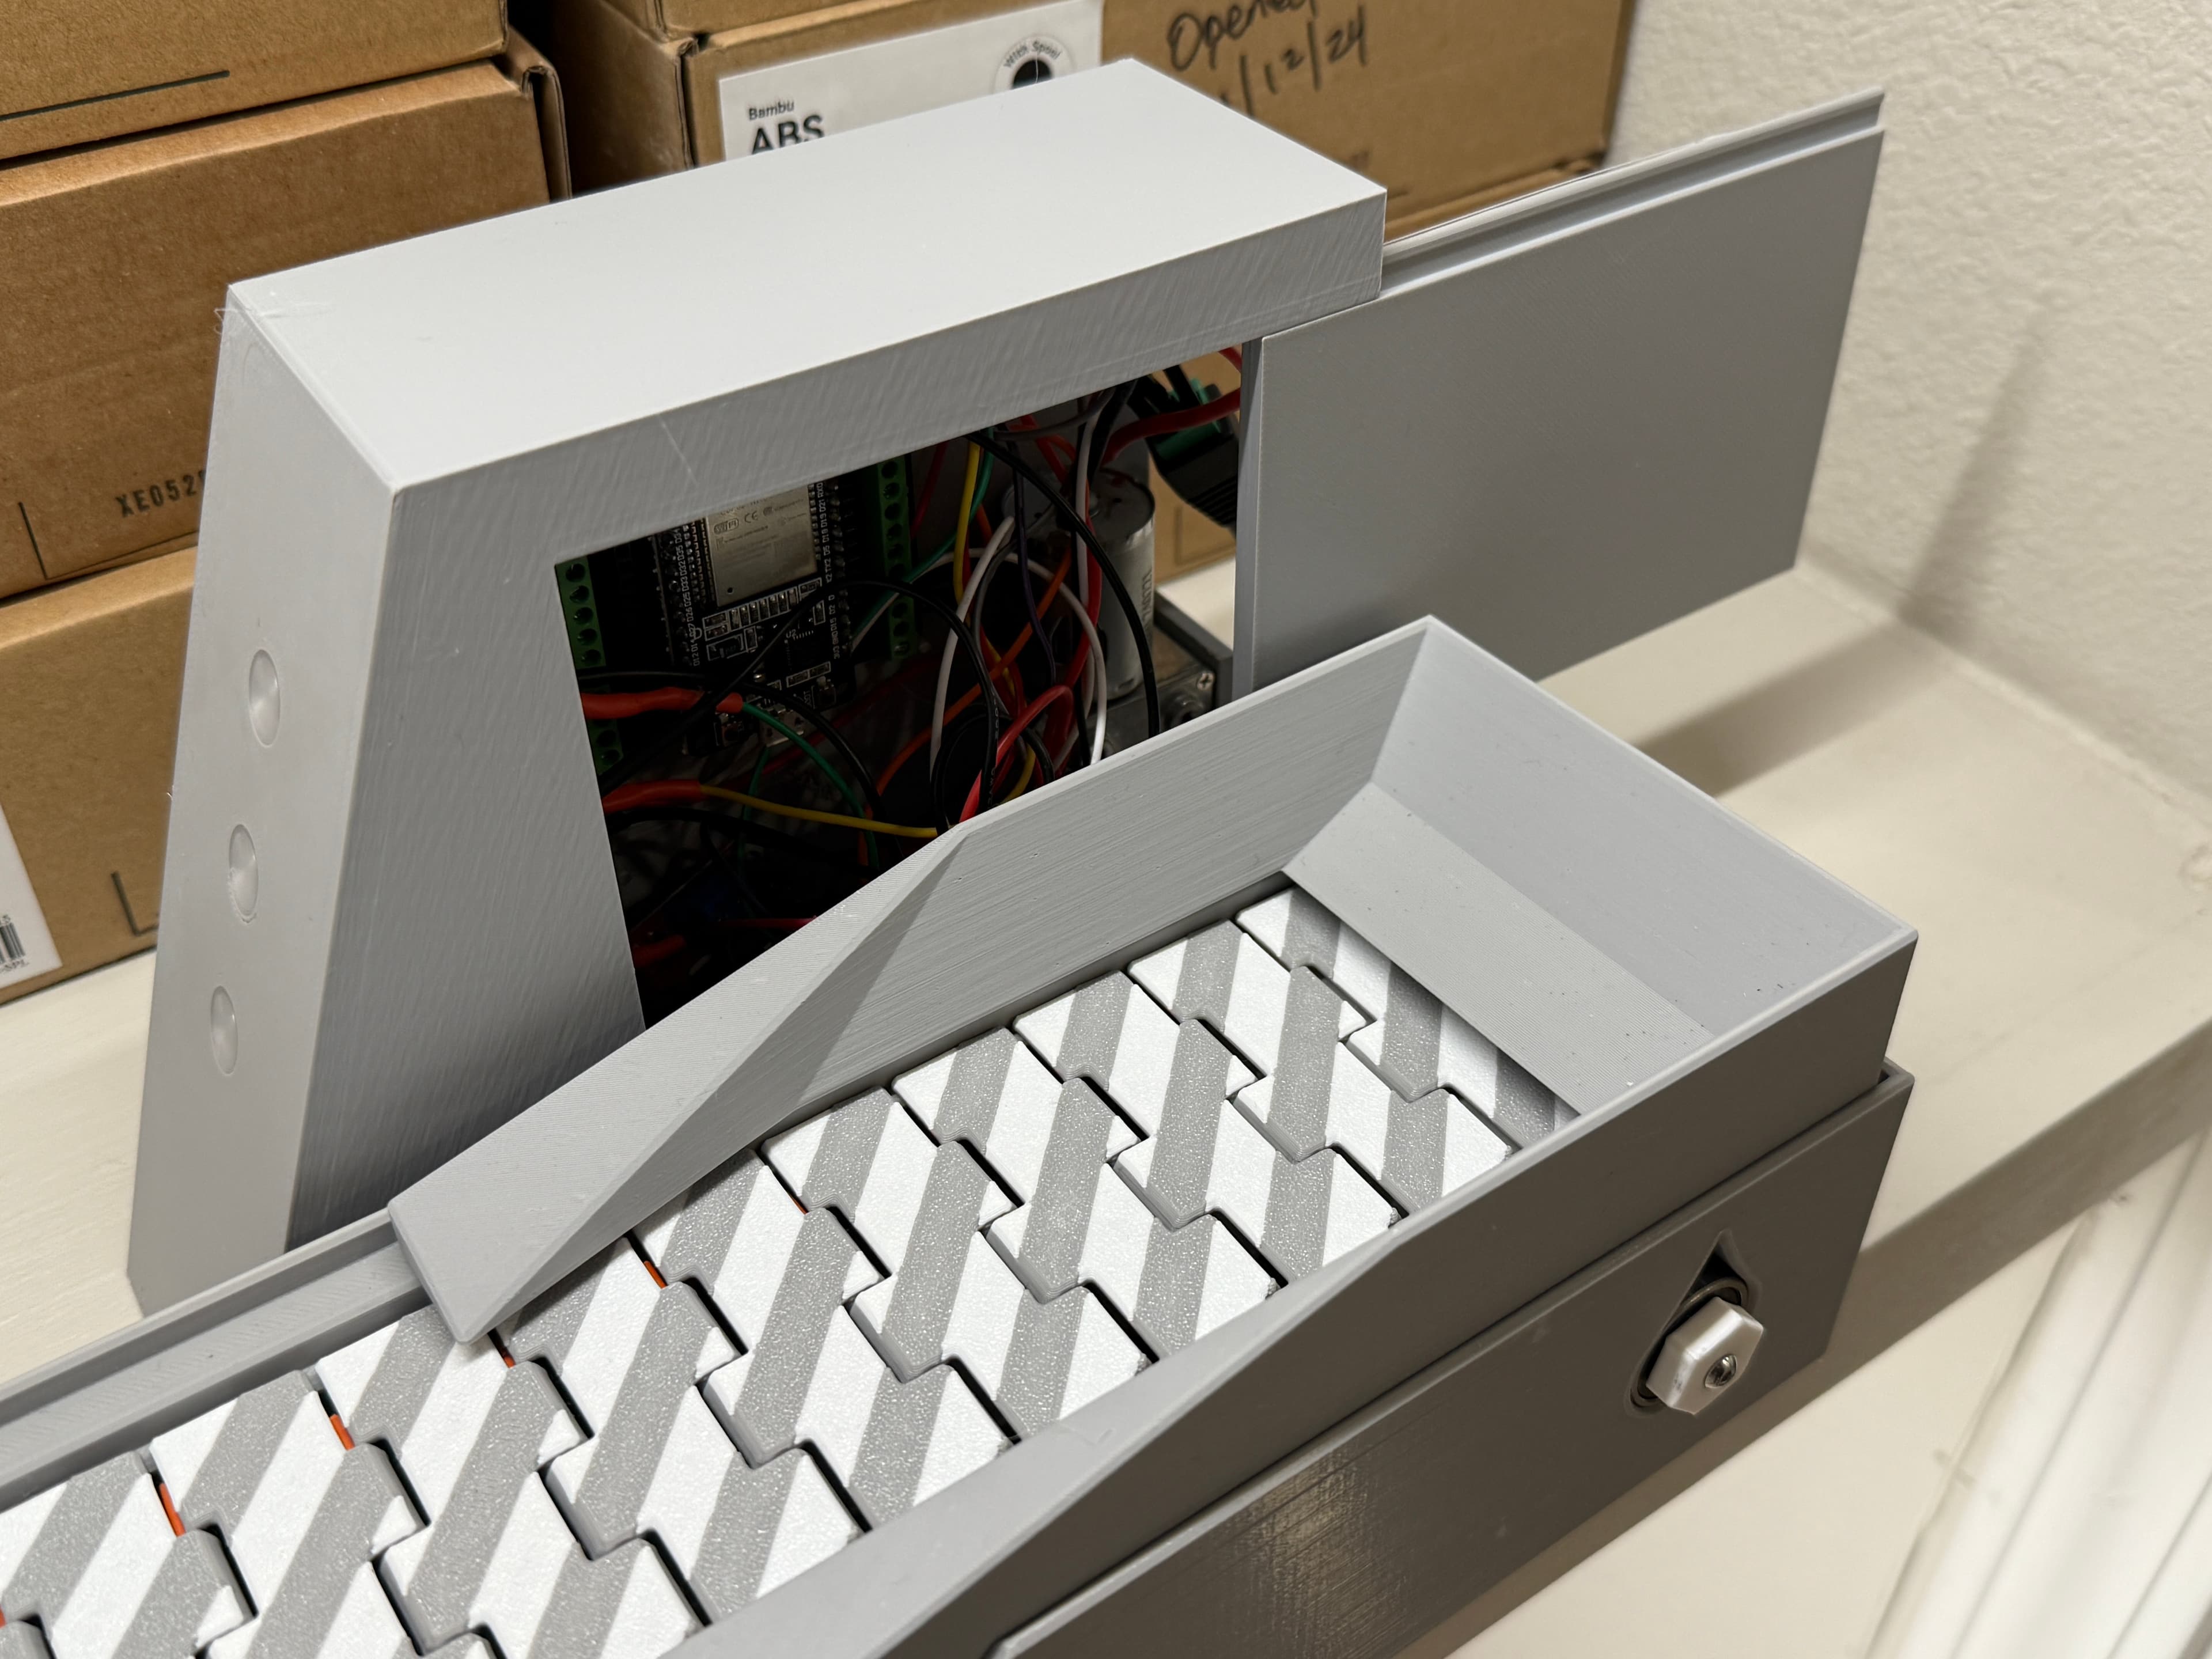
After hooking everything up it should look something like this
Fully assembled
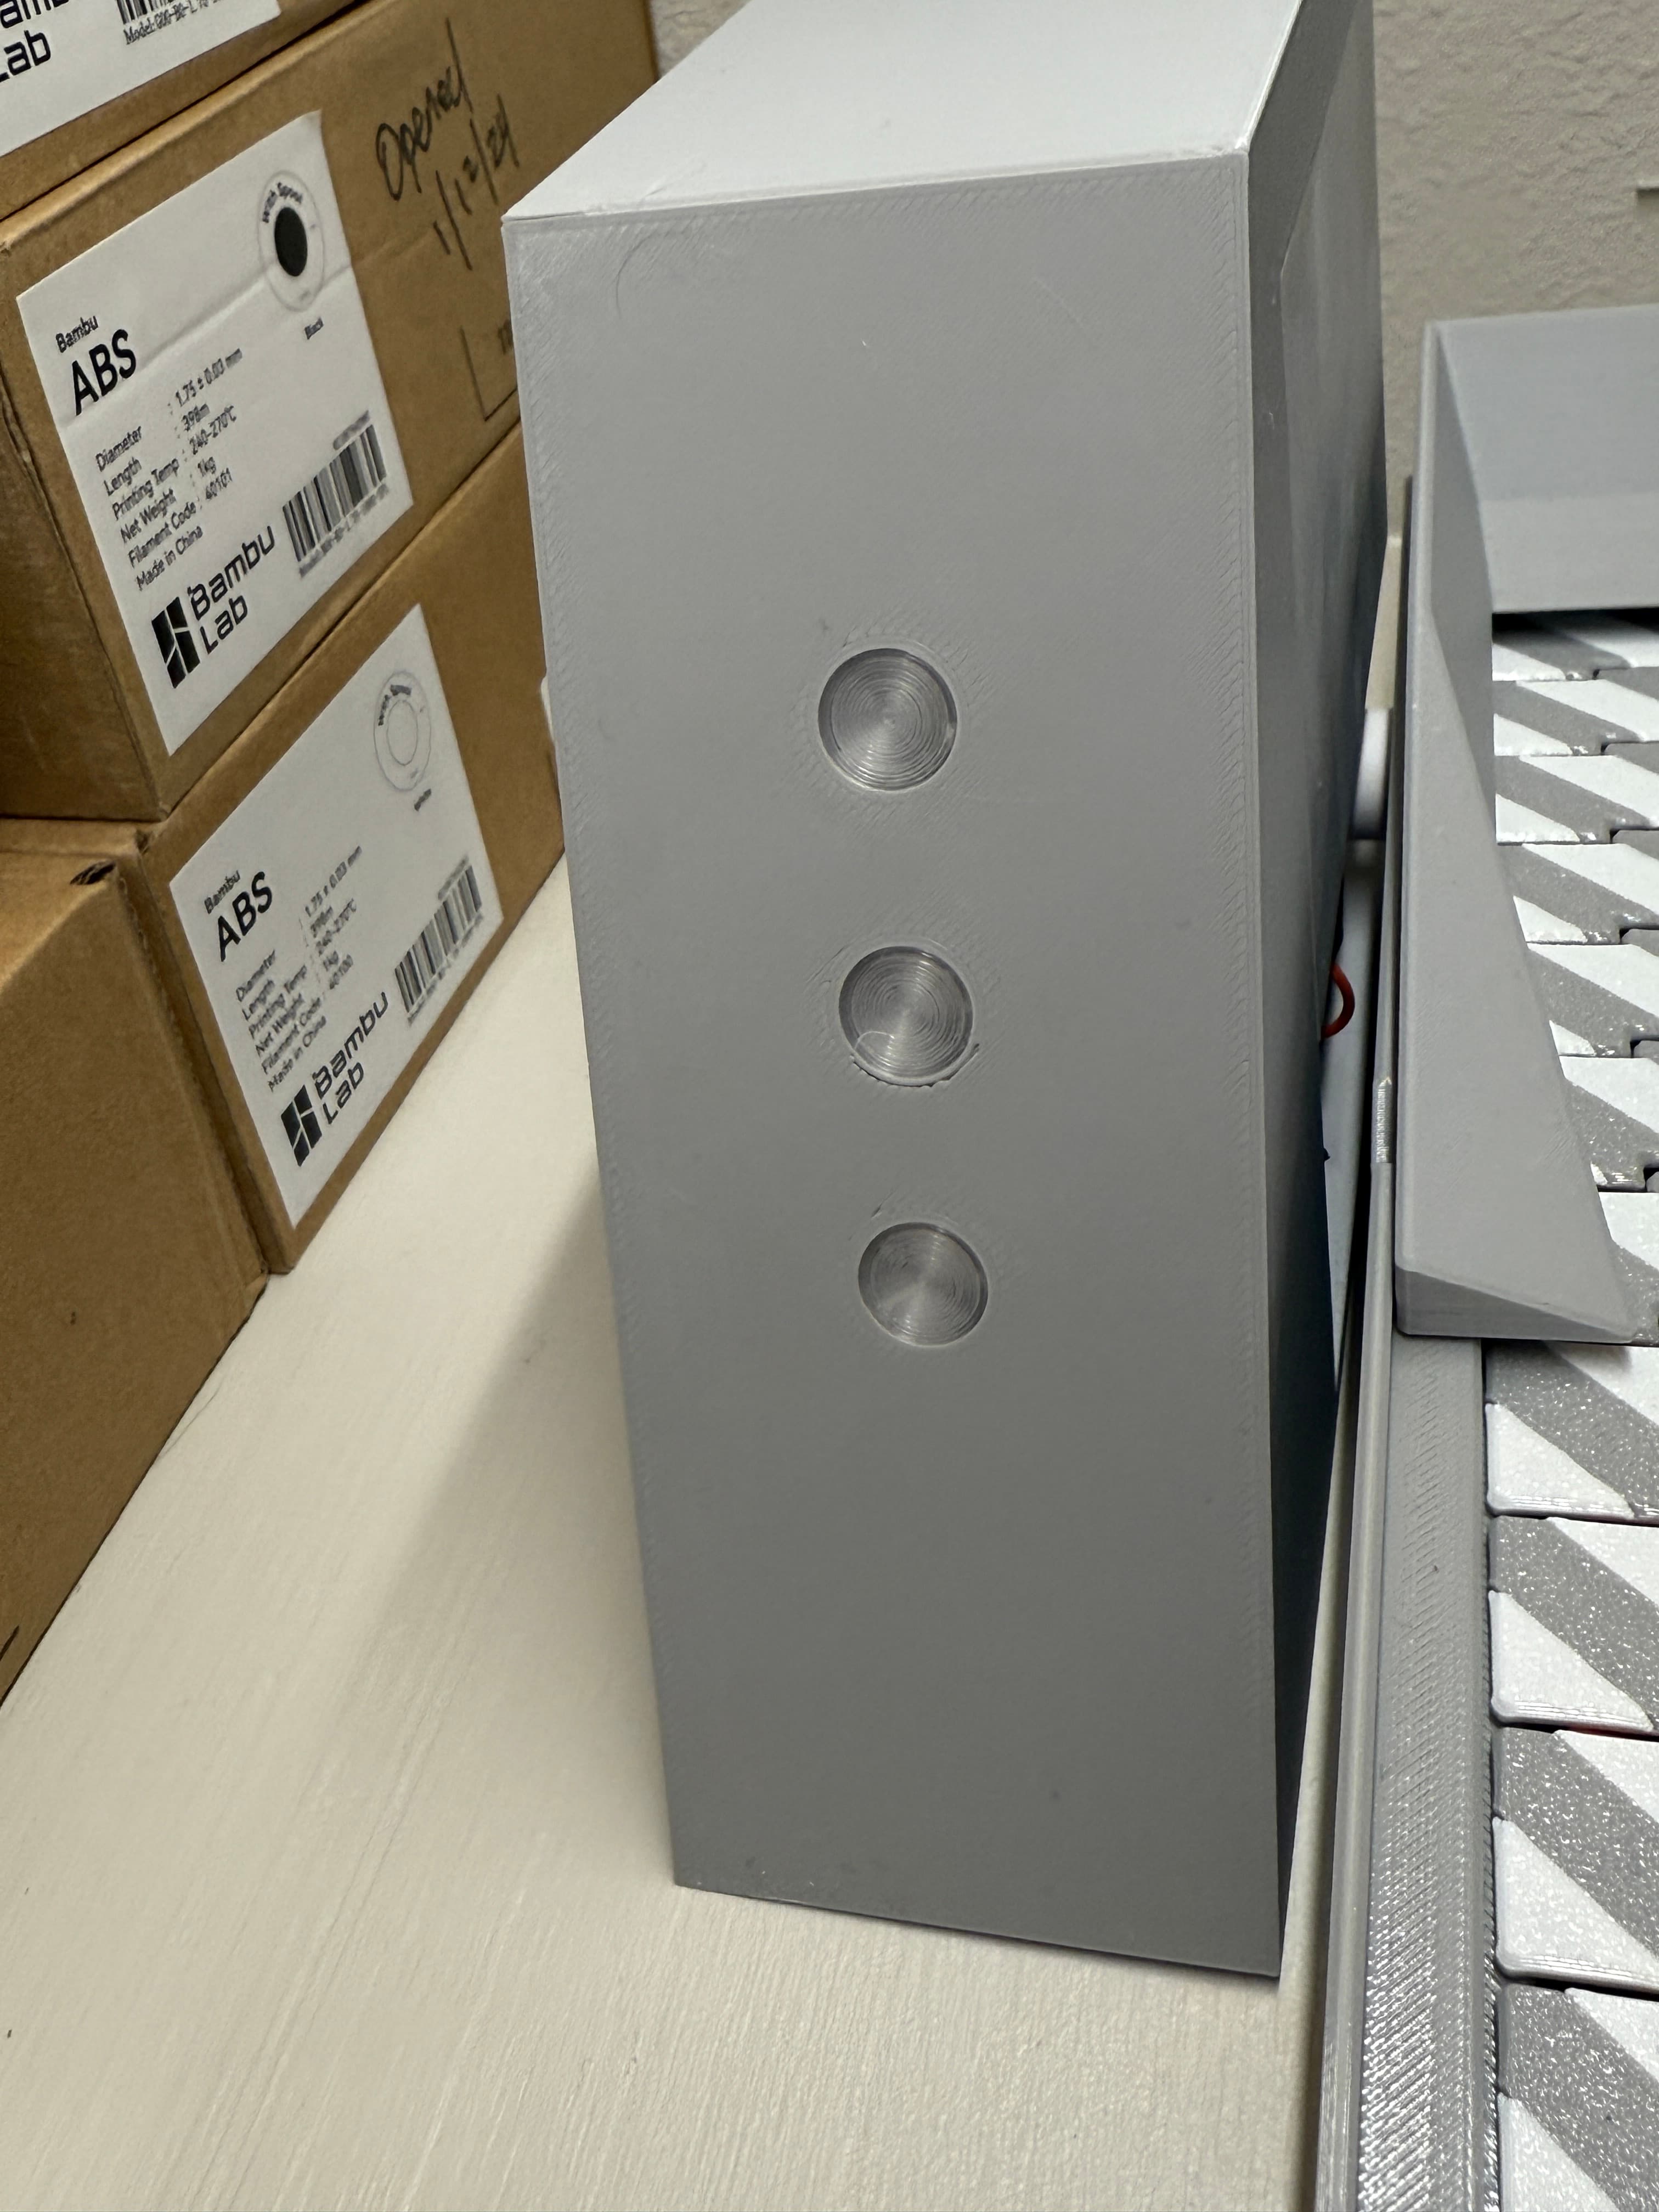
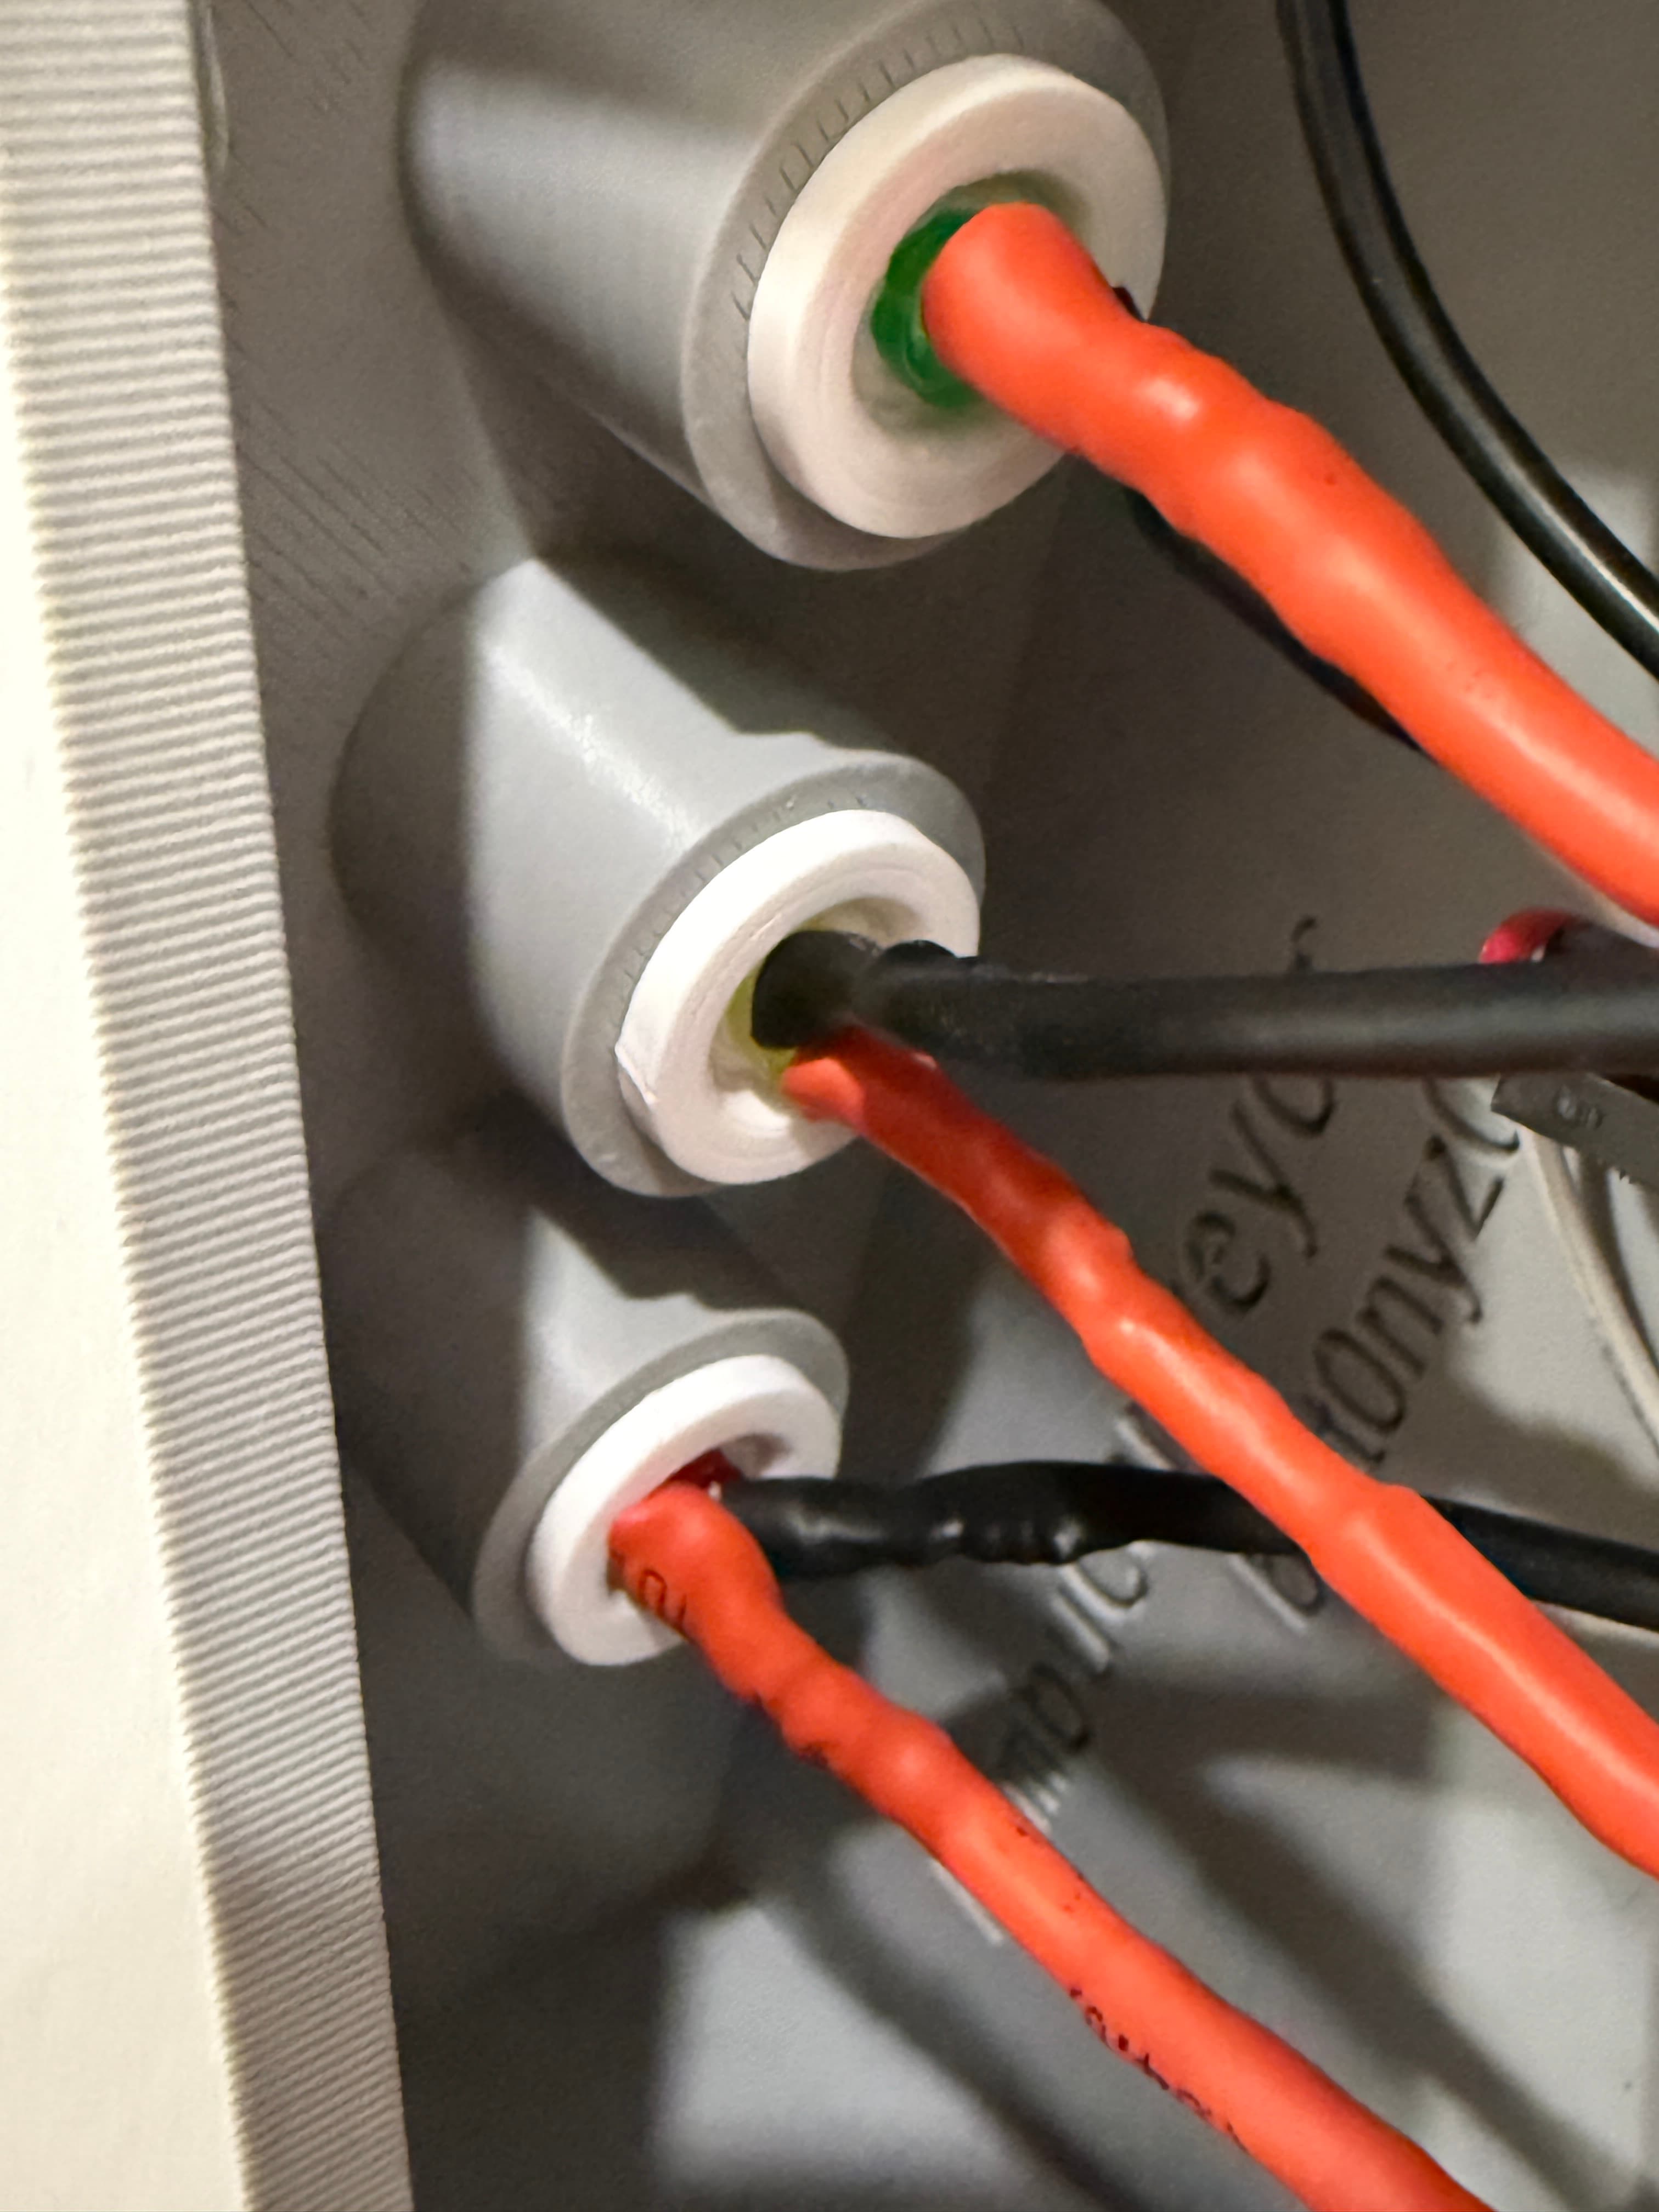
LED Insert before/after assembly
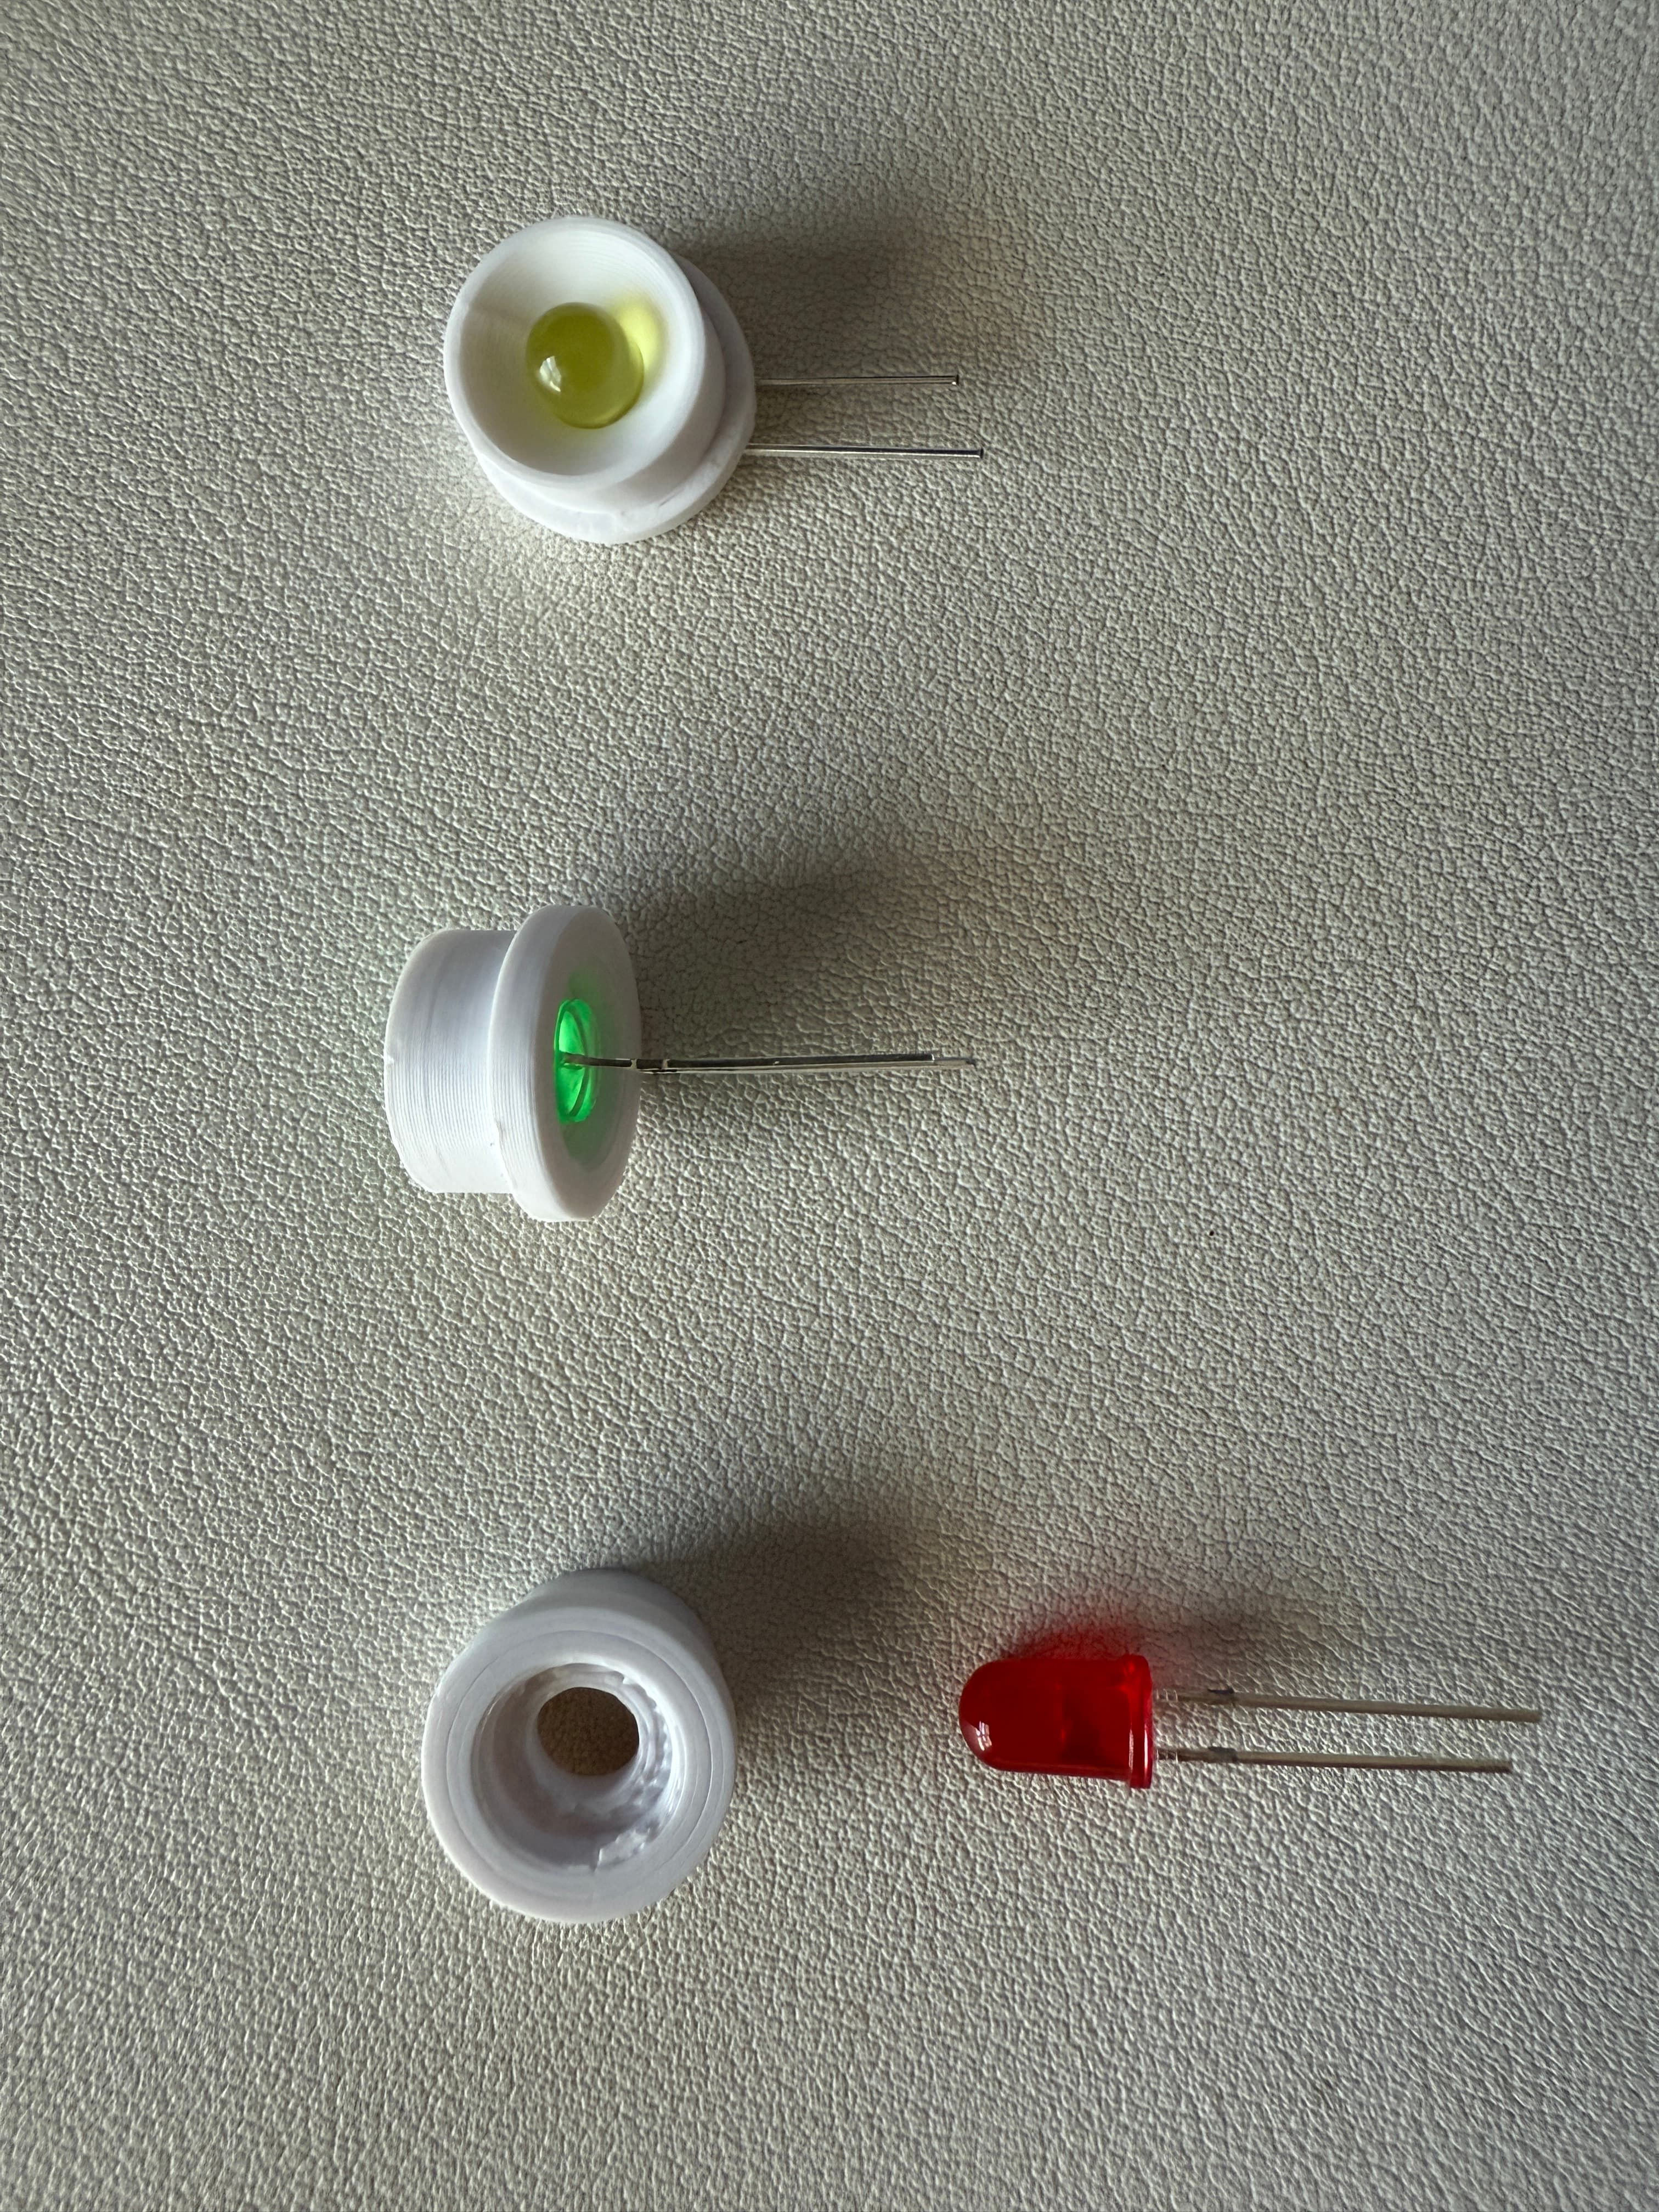
Insert LED
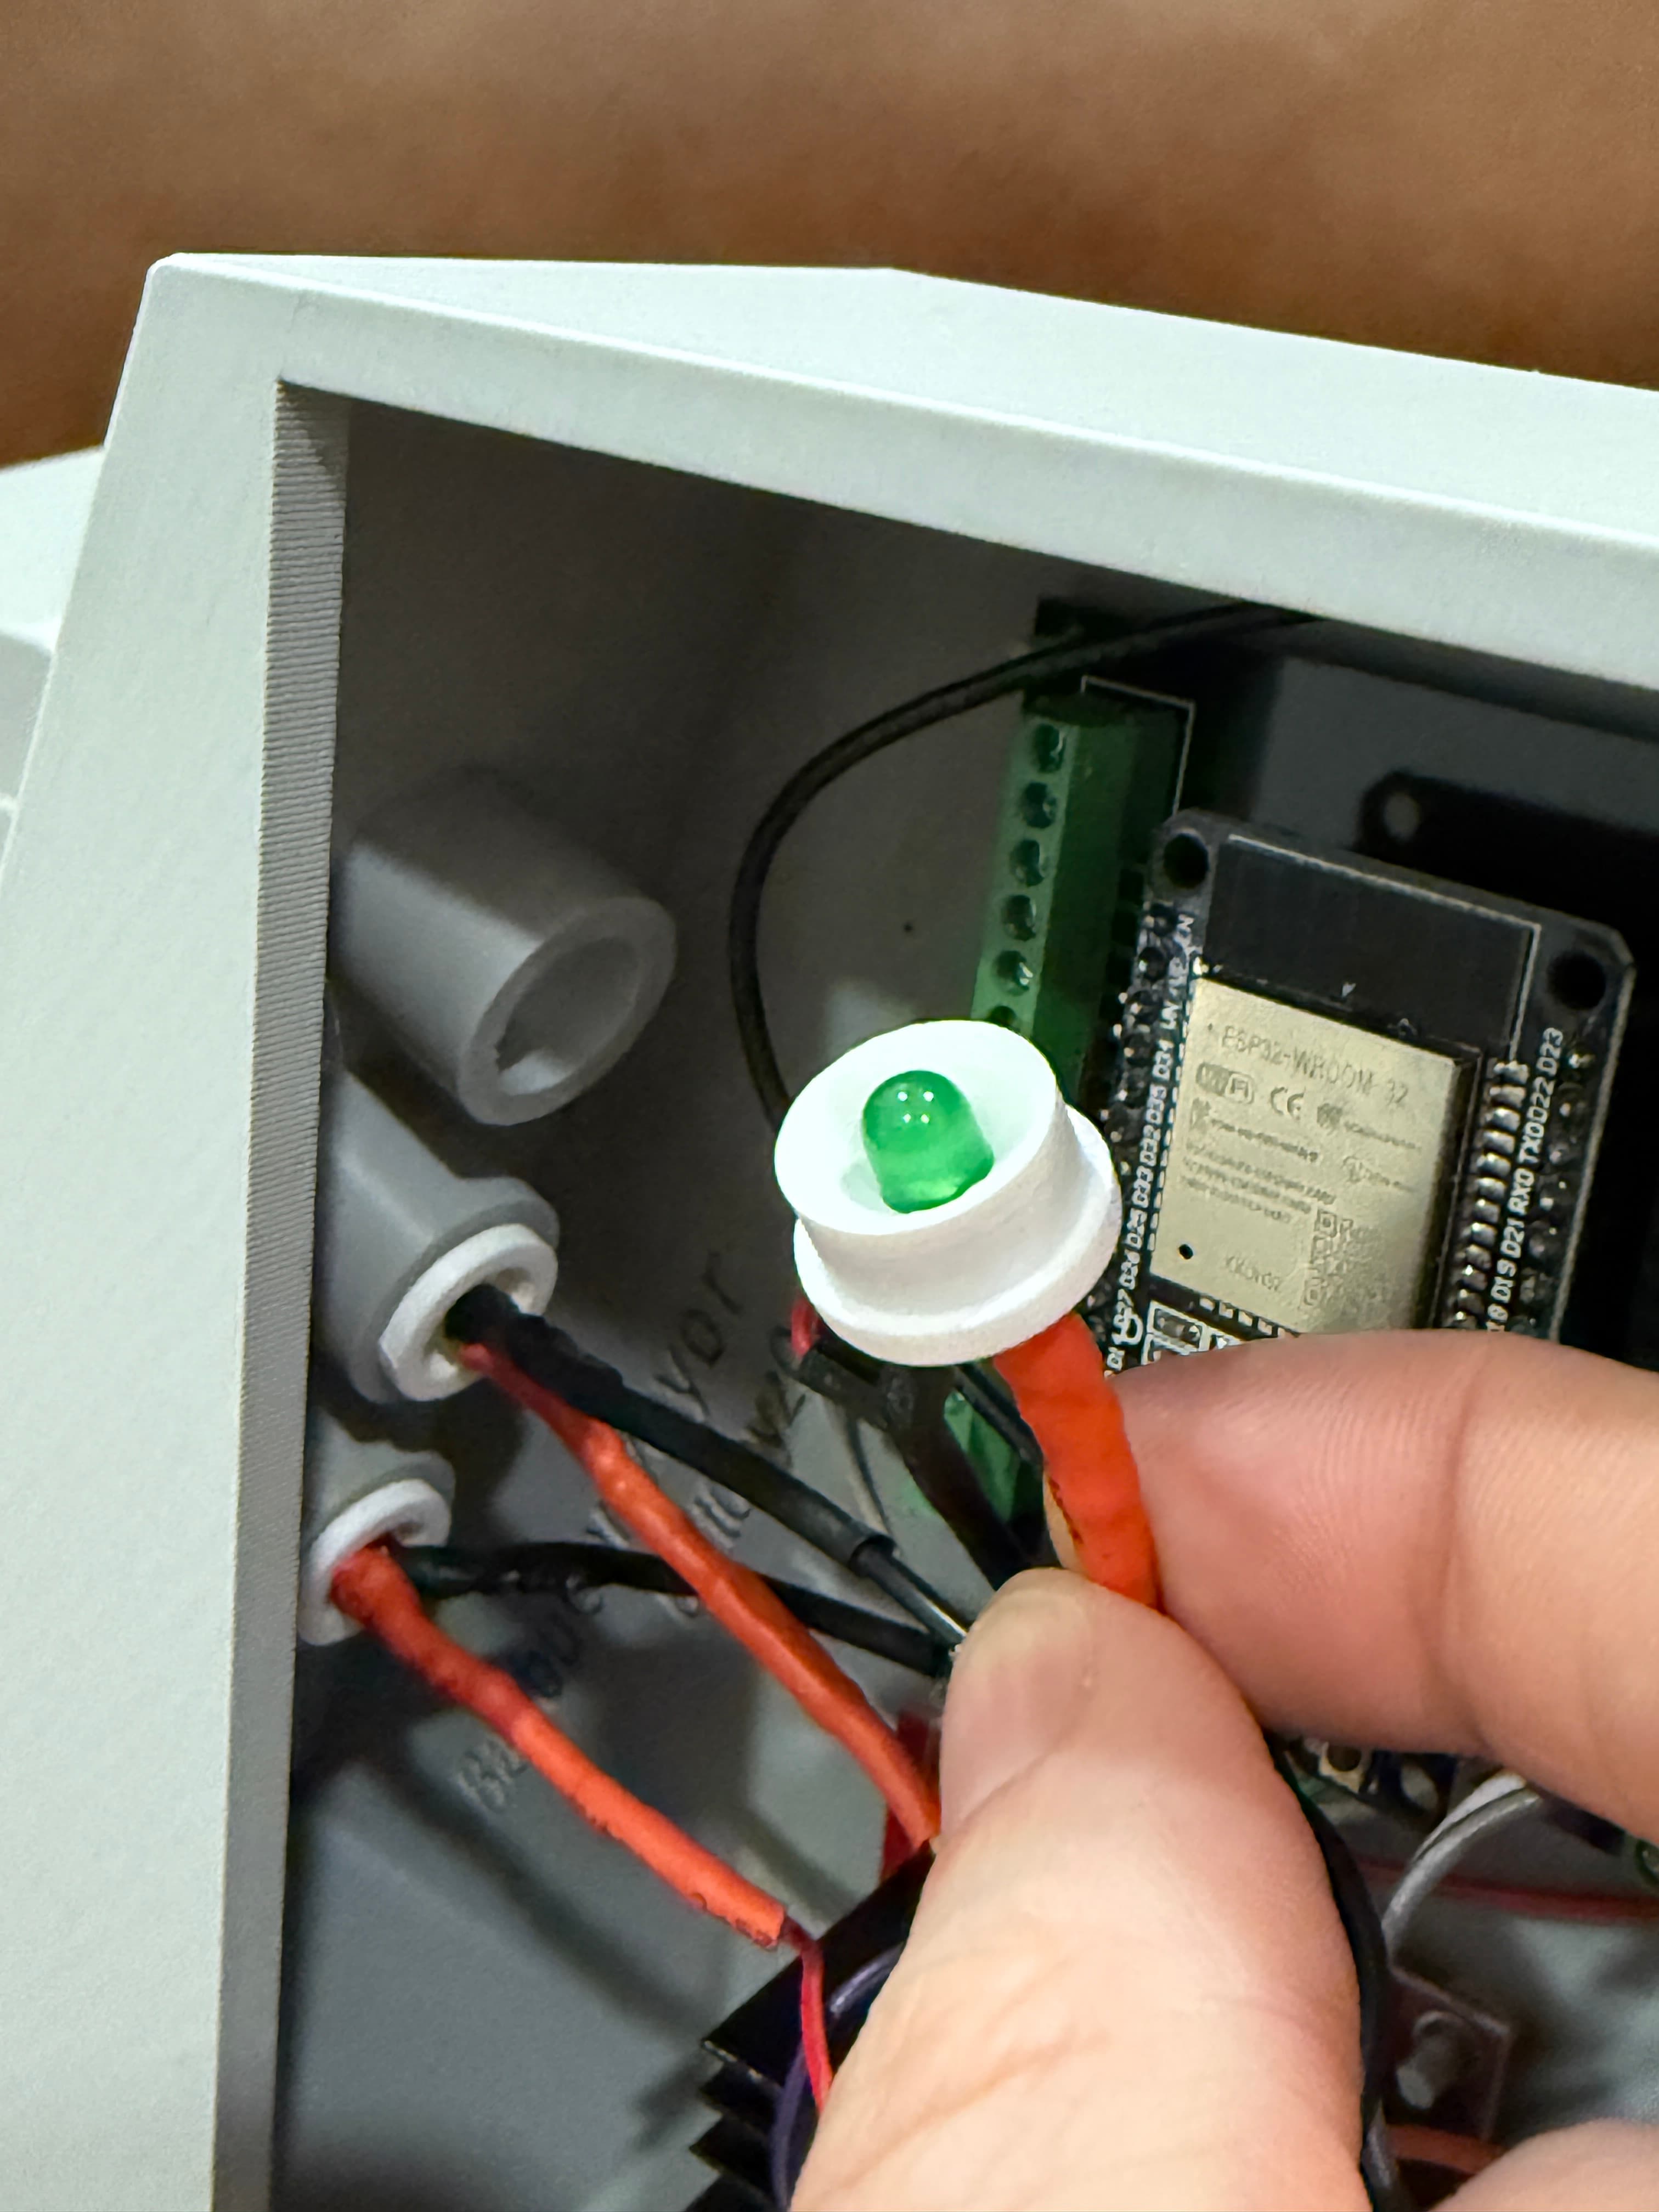
LED Insert - fully assembled
Flashing the ESP32
To install the firmware, use one of the following methods:
Method 1: Web installer (recommended)
Use the Bambu ESP32 Installer in desktop Chrome, Edge, or another Web Serial-capable browser.
Method 2: Manual installation (Expert)
-
Download and Install ESPTool
- Install
esptoolusing pip:pip install esptool - Alternatively, download the precompiled ESPTool from the official Espressif GitHub.
- Install
-
Download the Firmware File
- Download
Bambu-Poop-Conveyor-v1.5.4-merged.binfrom the latest GitHub release.
- Download
-
Connect Your ESP32
- Plug your ESP32 into your computer using a USB cable.
- Ensure drivers for the USB-to-serial adapter are installed (CH340, CP210x, etc.).
-
Find the Serial Port
- On macOS/Linux, run:
Look for something like
ls /dev/tty.*/dev/tty.usbserial-1. - On Windows, open Device Manager and check under Ports (COM & LPT).
- On macOS/Linux, run:
-
Flash the Firmware
- Replace
<PORT>with your ESP32’s serial port (e.g.,/dev/tty.usbserial-1):esptool --chip esp32 --port /dev/tty.usbserial-1 --baud 460800 write-flash \ 0x0 Bambu-Poop-Conveyor-v1.5.4-merged.bin
- Replace
-
Verify Flashing and Restart
- Once flashing completes, restart your ESP32 by unplugging/replugging it or pressing the EN or RST button.
Your ESP32 should now be running the updated firmware.
Once firmware is installed
The HTTPS installer stays open while it flashes the ESP32, collects Wi-Fi details through Improv Serial, and returns the new device address. The ESP32 control center itself then runs locally over HTTP.
If serial Wi-Fi setup is skipped, the ESP32 starts in Access Point (AP) Mode:
- Power on your ESP32.
- Connect your computer or phone to the BambuConveyor Wi-Fi network using password
12345678. - Open a browser and go to 192.168.4.1.
- Enter the network, printer, and conveyor settings.
- Click Save, and the ESP32 will reboot into the configured Wi-Fi network.
Usage
Web Server
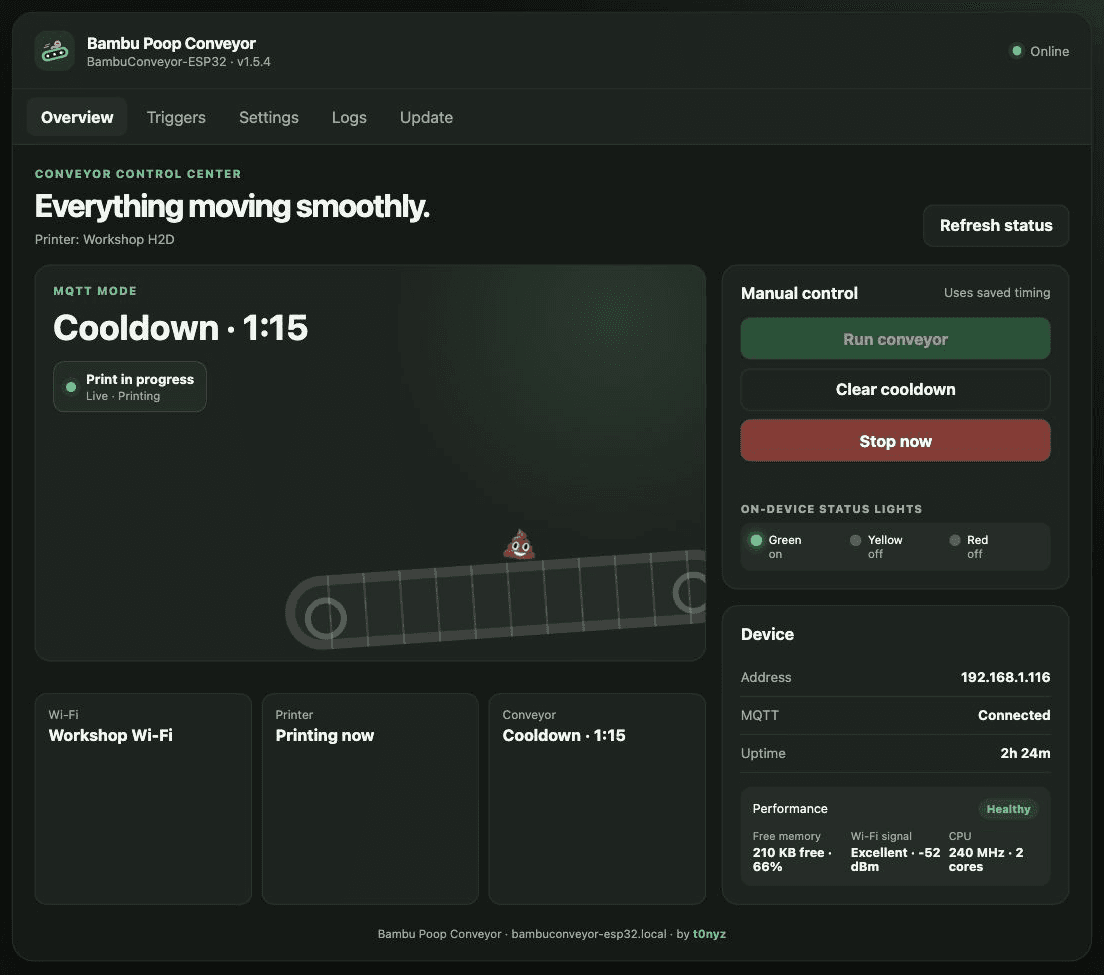
The ESP32 now hosts one responsive interface for status, manual control, configuration, event rules, logs, and updates:
- Control center:
/ - Detailed device status:
/api/status - Manual run:
POST /api/motor/run - Emergency stop:
POST /api/motor/stop - Clear cooldown:
POST /api/motor/clear-cooldown - Settings:
GET /api/configorPOST /api/config - Trigger rules:
GET /api/triggersorPOST /api/triggers - Logs:
GET /api/logs
Legacy /config, /control, /logs, /update, /run, and /status URLs remain available for existing bookmarks and integrations.
Overview and live cooldown
Configuration screen
Network and Printer have separate sections and save controls. Settings highlights missing printer details, while a connected Wi-Fi network needs no additional setup. Use Find printer to discover Bambu printers on the same network, select one to fill its details, then enter its LAN access code and choose Save & check printer.
Routine settings responses omit saved passwords and access codes. Show explicitly retrieves the selected saved value from this device; Hide masks it again. The device’s HTTP interface has no login, so use these controls only on a trusted local network.
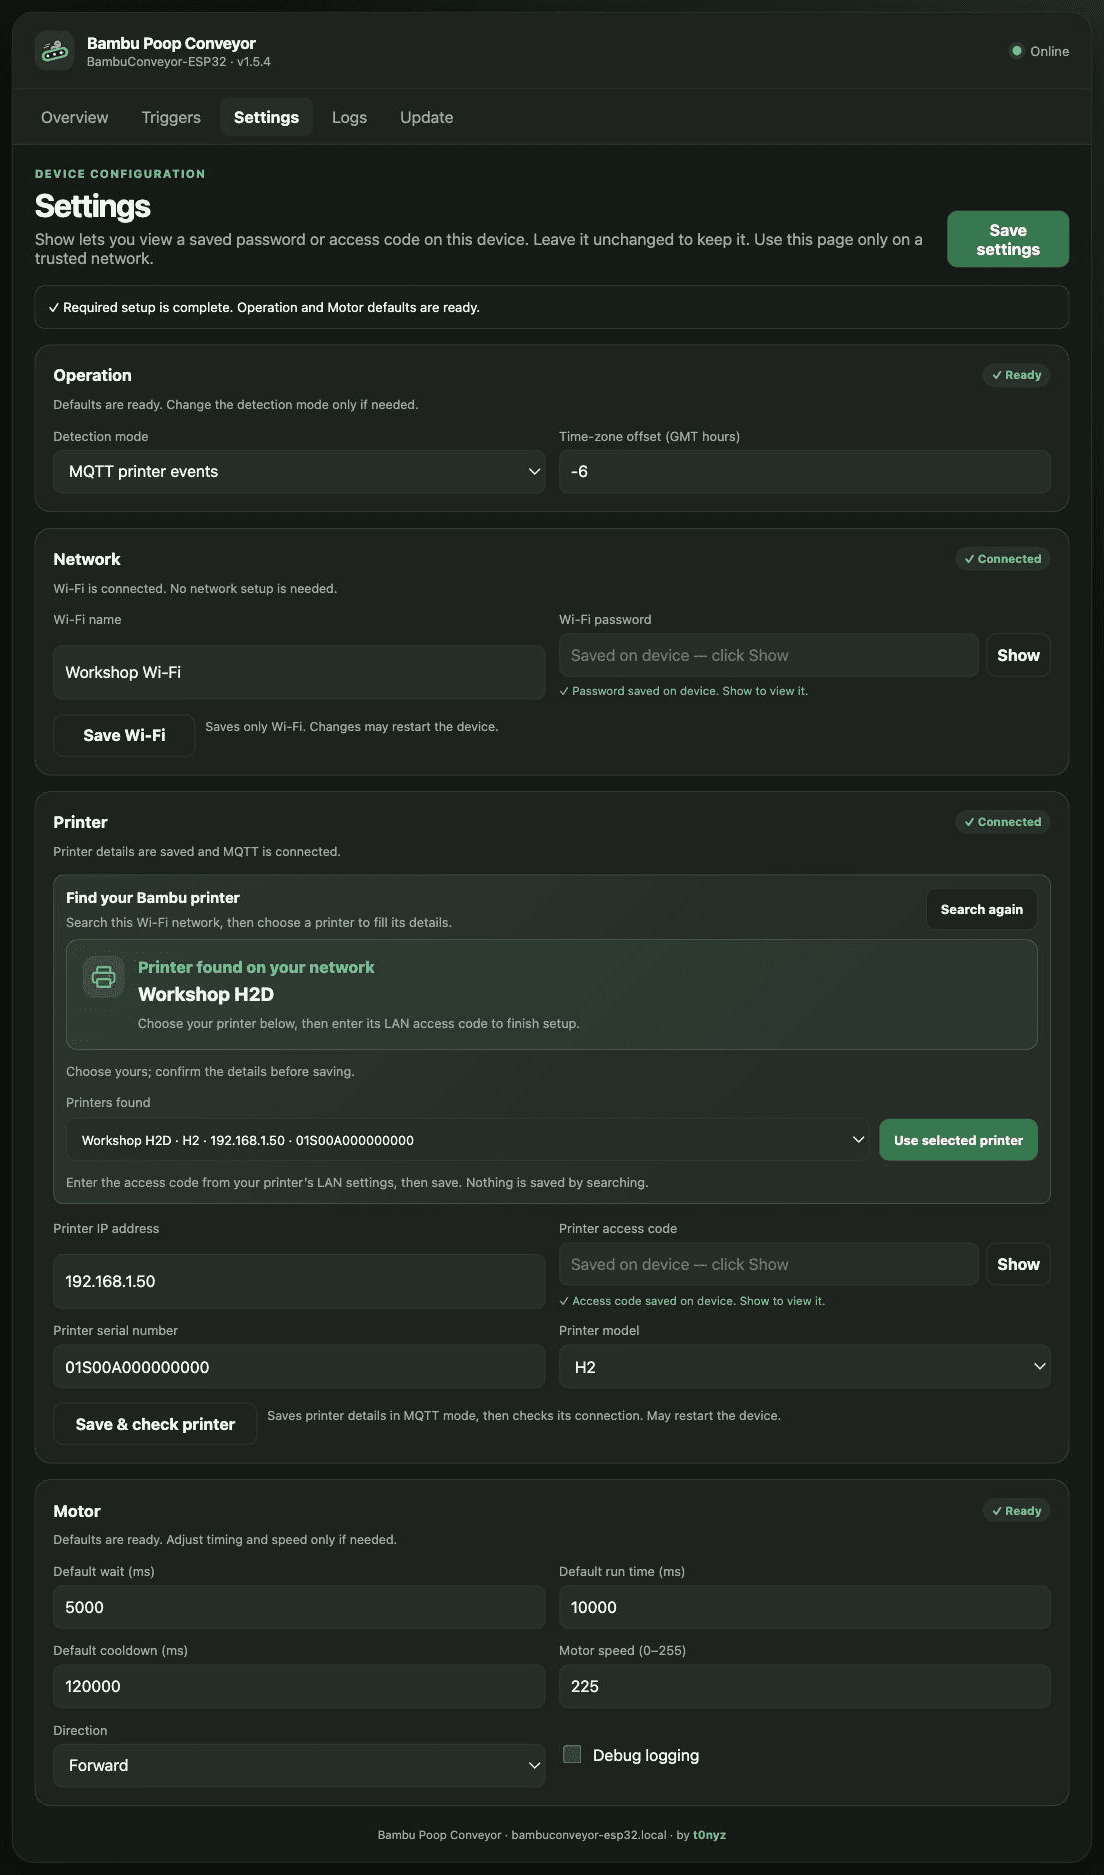
Note: If in Motion Detection mode, be sure to lower the “Delay After Run”. Recommended time is 3000 (3 seconds).
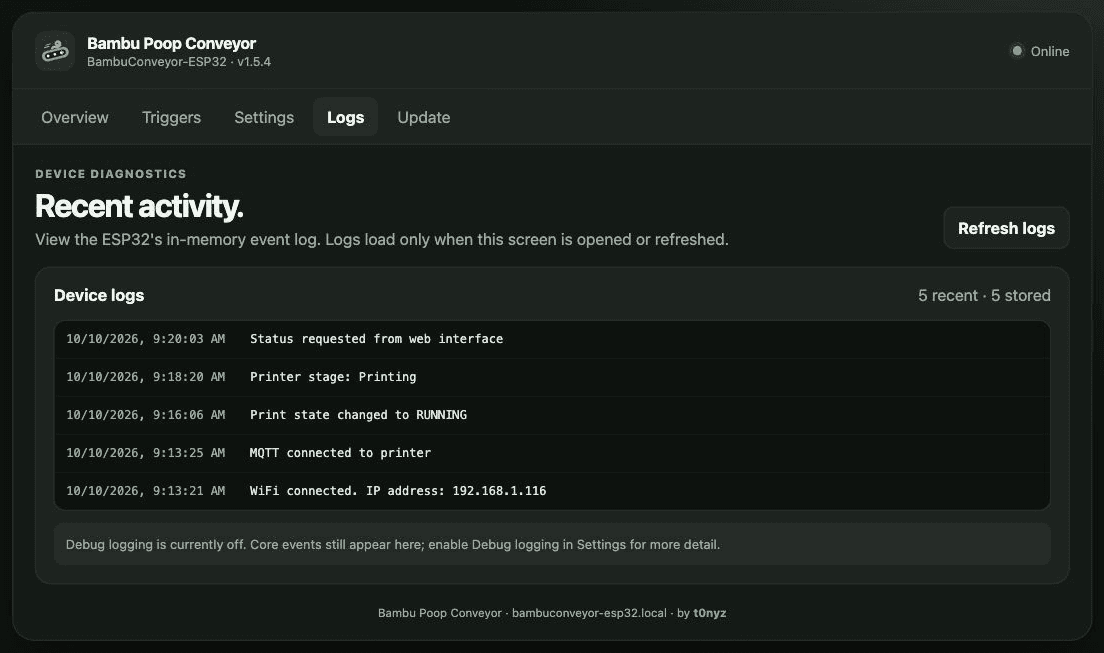
Log screen
Printer event rules
Firmware updates
The Update screen can download a published release directly from the Developer Site or an available GitHub mirror, then upload, reboot, reconnect, and verify without requiring the user to select a file. A separate previous-stable card offers the original, checksum-verified v1.5.1 release. The web installer also keeps v1.4.2 as legacy recovery. Older firmware retains its original v1.4.2 feed; recovery files are never mixed into the public or beta channels.
The public web installer includes two recovery choices: an OTA file for a working v1.5 device and a clean USB installation for an unreachable device. OTA rollback retains stored settings; a clean USB recovery can erase them. After a beta is promoted, the Update screen shows “No newer beta available” rather than offering an older test build. Archived beta files remain intact.
Motor Control Timings
Optional — configure the motor run time, wait time, and cooldown:
int motorRunTime = 10000; // Run for 10 seconds by default
int motorWaitTime = 5000; // Wait 5 seconds after detecting the event
int delayAfterRun = 120000; // Prevent another automatic run for 2 minutesNote: If in Motion Detection mode, be sure to lower the “Delay After Run”. Recommended time is 3000 (3 seconds).
PWM Configuration
Optional - set the PWM properties for motor control:
const int freq = 5000;
const int pwmChannel = 0;
const int resolution = 8;
int dutyCycle = 220; // Motors power level (255 for full power) / I run just under that for no reason other than my own preference
FAQ / Troubleshooting
Before troubleshooting, make sure the device is not in AP mode. The motor will not run until the ESP32 is connected to Wi-Fi.
What do the status lights mean when it is first turned on?
- Flashing yellow only = Connecting to Wi-Fi
- Solid green = Connected to Wi-Fi and the printer through MQTT
- Red on startup = No Wi-Fi or MQTT connection (red also illuminates while the conveyor is running)
- Green off with yellow flashing and red on = Wi-Fi connected but the printer MQTT connection is unavailable
When no motor cycle is active, yellow begins flashing after a five-second printer disconnection. A successful reconnection clears yellow/red and restores green. Motor waiting and running indicators take priority.
The ESP32 does not connect to the printer
- Double-check that your printer has an access code configured and LAN Only Mode is off. See the Bambu Lab Wiki.
- Double-check that the printer serial number matches the value entered in Settings.
- Make sure both the printer and ESP32 have a strong Wi-Fi signal.
- Reach out to me if you still have issues.
Motion detection mode is not working
- Verify the wiring. The 3.3 V connection should run to the lower-left pin of the motion sensor.
License
This project is licensed under the MIT License. See the LICENSE file for details.