Control My Desk Light
This interactive example lets you control my desk light in near real time by simply hovering over or tapping the circle below. You are assigned a random color.
Hover over or tap the circle

How It Works
- MQTT Communication: When you hover over or tap the circle, a message is sent via the MQTT protocol to the AWS IoT service. MQTT is a lightweight messaging protocol often used for IoT (Internet of Things) devices. The entire process—from hovering over or tapping the circle to changing the light’s color—happens in just milliseconds, providing a near-instantaneous response.
- AWS IoT: AWS IoT acts as a hub for managing and communicating with devices over the internet.
- ESP32 at Home: At my home, an ESP32 microcontroller is continuously listening to the MQTT messages sent from AWS IoT. Upon receiving the command, this ESP32 instantly relays the message to the WLED device, which controls the light.
This setup allows you to interact with the physical WLED light on my desk directly through this web page.
What the light looks like

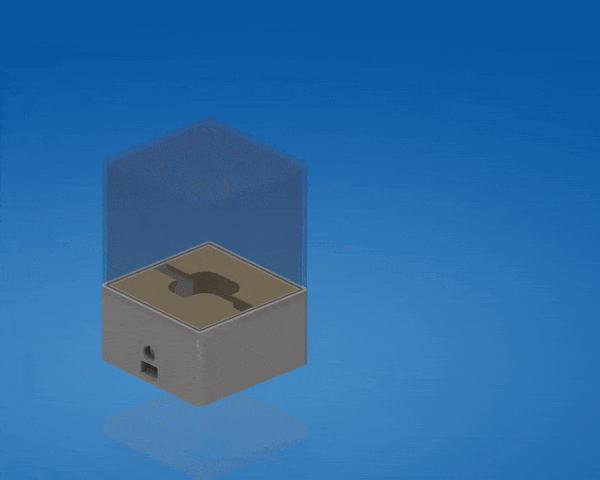
3D Printed Housing
I made a custom case in Fusion360 that houses the ESP32 and Govee LED. Designed to hold a single Govee Permanent Outdoor Pro light.
Fusion 360 source files can be found here: MakerWorld project
I used this Govee light because I had a few extras from my home install. There are endless options for lights that are compatiable with WLED project.
- The filament used for the transparent lamp part is: Bambu Labs Translucent PETG
- The filament used for the black base is: Bambu Labs Black PETG-HF
Optionally you could use PLA for the base, and maybe even PLA white for the lamp.

Cloud Architecture

While we’re using a website to initiate the MQTT request, it could just as easily come from a variety of other sources or devices.
WLED ESP32 Setup
If you are new to WLED I suggest starting here: getting started guide
Otherwise, install WLED here
Parts I use for building the light:
- ESP32 board: https://amzn.to/4fBjh5L
- Wires: https://amzn.to/46EAtn3
- Power connector: https://amzn.to/3T4xRsS
- Voltage converter: https://amzn.to/3AEjx4a
AWS Bridge ESP32 Setup
ESP32 microcontroller is continuously listening to the MQTT messages sent from AWS IoT. Upon receiving the command, this ESP32 instantly relays the message to the WLED device, which controls the light.
⚠️ This information is a work in progress, make sure you update the values in this script to match your own settings. I will be updating this page with more information on how to setup AWS from sratch.
For now, you should follow this guide to prepare your AWS account for this project: setup aws iot core and mqtt
ESP32 Bridge Source: Github project
#include <WiFiClientSecure.h>
#include <PubSubClient.h>
#include <WiFi.h>            // Include the WiFi library
#include <HTTPClient.h>

const char* ca_cert = \
"-----BEGIN CERTIFICATE-----\n" \
"LONG RSA KEY INFO HERE \n" \
"-----END CERTIFICATE-----\n";

const char* device_cert = \
"-----BEGIN CERTIFICATE-----\n" \
"LONG RSA KEY INFO HERE \n" \
"-----END CERTIFICATE-----\n";

const char* private_key = \
"-----BEGIN RSA PRIVATE KEY-----\n" \
"LONG RSA KEY INFO HERE \n" \
"-----END RSA PRIVATE KEY-----\n";

WiFiClientSecure net;
PubSubClient client(net);

void sendHttpToWLED(String url, String payloadStr) {
  HTTPClient http;
  http.begin(url);
  http.addHeader("Content-Type", "application/json");

  int httpResponseCode = http.POST(payloadStr);

  if (httpResponseCode > 0) {
    Serial.print("HTTP Response code: ");
    Serial.println(httpResponseCode);
  } else {
    Serial.print("Error on sending POST: ");
    Serial.println(httpResponseCode);
  }

  http.end();
}

void messageReceived(char* topic, byte* payload, unsigned int length) {
  Serial.print("Message arrived [");
  Serial.print(topic);
  Serial.print("] ");
  for (unsigned int i = 0; i < length; i++) {
    Serial.print((char)payload[i]);
  }
  Serial.println();

  // Convert payload to String
  String payloadStr = String((char*)payload).substring(0, length);

  // Define the WLED HTTP API endpoint
  String url = "http://10.0.0.125/json/state";  // Replace with the actual IP of your WLED device

  // Send the received MQTT payload directly to the WLED device as an HTTP request
  sendHttpToWLED(url, payloadStr);
}

void setup() {
  Serial.begin(115200);

  WiFi.begin("--YOUR WIFI SSID--", "--YOUR WIFI PASSWORD--");
  while (WiFi.status() != WL_CONNECTED) {
    delay(1000);
    Serial.println("Connecting to WiFi...");
  }
  Serial.println("Connected to WiFi");

  net.setCACert(ca_cert);
  net.setCertificate(device_cert);
  net.setPrivateKey(private_key);

  client.setServer("--YOUR AWS IOT ENDPOINT ADDRESS--", 8883);
  client.setCallback(messageReceived);

  if (client.connect("-- YOUR AWS IOT CLIENT ID --")) {
    Serial.println("Connected to AWS IoT");
    client.subscribe("-- YOUR AWS IOT TOPIC --");  // Subscribe to the topic where commands will be sent
  } else {
    Serial.print("AWS IoT connection failed, state: ");
    Serial.println(client.state());
  }
}

void loop() {
  if (!client.connected()) {
    Serial.println("Disconnected from AWS IoT. Attempting reconnection...");
    while (!client.connect("-- YOUR AWS IOT CLIENT ID --")) {
      delay(1000);
      Serial.print(".");
    }
    Serial.println("Reconnected to AWS IoT");
    client.subscribe("lights");
  }

  client.loop();  // Handle AWS IoT MQTT messages
}
Backend/Frontend Code
AWS-IoT Library Install
NPM
sudo npm install @aws-sdk/client-iot-data-plane PNPM (Super fast version of NPM - you should think about it)
sudo pnpm install @aws-sdk/client-iot-data-plane Frontend
Create a React page that lights up red when accessed
import { useState, useEffect } from 'react';

useEffect(() => {
  const triggerLightFlash = async () => {
    try {
      const response = await fetch('/api/publish', {
        method: 'POST',
        headers: {
          'Content-Type': 'application/json',
        },
        body: JSON.stringify({ color: '#FF0000' }),  // Set the color to red
      });
      console.log('Light flash triggered:', await response.json());
    } catch (error) {
      console.error('Error triggering light flash:', error);
    }
  };

  triggerLightFlash();
}, []);
Backend ('/api/publish')
import { IoTDataPlaneClient, PublishCommand } from "@aws-sdk/client-iot-data-plane";

export default async function handler(req, res) {
  const { color } = req.body;

  const client = new IoTDataPlaneClient({
    region: "us-east-1", // Replace with your AWS region
    credentials: {
      accessKeyId: process.env.AWS_ACCESS_KEY_ID,
      secretAccessKey: process.env.AWS_SECRET_ACCESS_KEY,
    }
  });

  // Turn the light on with the specified color
  const paramsOn = {
    topic: "lights",
    payload: JSON.stringify({
      "seg": [
        {
          "col": [[parseInt(color.slice(1, 3), 16), parseInt(color.slice(3, 5), 16), parseInt(color.slice(5, 7), 16)]],
          "fx": 0,  // Solid color (no effect)
          "bri": 255  // Full brightness
        }
      ]
    }),
    qos: 1
  };

  // Turn the light off after a short delay
  const paramsOff = {
    topic: "lights",
    payload: JSON.stringify({
      "seg": [
        {
          "col": [[0, 0, 0]],  // Black (off)
          "fx": 0,  // Solid color (no effect)
          "bri": 0  // Turn off brightness
        }
      ]
    }),
    qos: 1
  };

  try {
    // Send the command to turn the light on
    await client.send(new PublishCommand(paramsOn));

    // Wait for 1 second to simulate a quick flash
    await new Promise(resolve => setTimeout(resolve, 1000));

    // Send the command to turn the light off
    await client.send(new PublishCommand(paramsOff));

    res.status(200).json({ message: "Light blinked successfully and turned off", data: { color } });
  } catch (err) {
    res.status(500).json({ message: "Error controlling the light", error: err });
  }
}
Other Potential Use Case Examples
- Blink a specific color when someone visits the root URL of your website (e.g.,
'/'lights up blue). - Blink a specific color when someone visits a particular page (e.g.,
'/contact-us'lights up red). - Blink a specific color when more than 10 people are on your site simultaneously.
- Control hundreds of WLED ESP32s from a central bridging ESP32.
FAQ
Why use AWS IoT instead of connecting to WLED directly from the website?
Using AWS IoT allows us to process commands in a centralized location with the added benefit of scalability. Additionally, it helps protect our local IP address from exposure.
Why do we need a ESP32 acting as a bridge between AWS-IoT and WLED?
WLED currently does not support secure MQTT connections, so the ESP32 acts as a bridge to facilitate this communication. Additionally, this setup allows us to scale by supporting multiple WLED devices listening to commands from AWS IoT.
More images

Power plug cutouts / optional micro usb access

Archimedean chord infill turned out great for the top

Lamp removed

Wiring

Assembled without lamp
